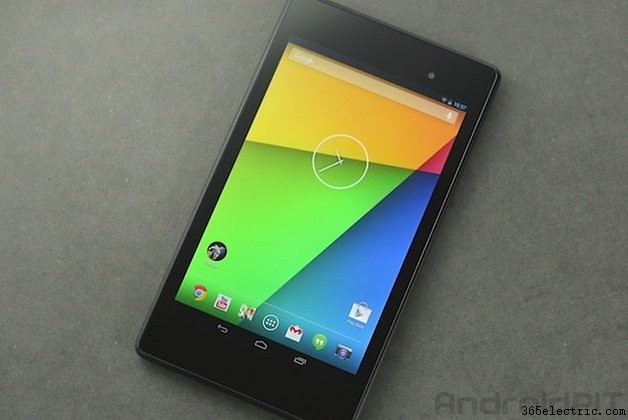
Nexus 7 (2013) のヒントとコツ
。基本的には、GoogleのNexusスマートフォンのより大きなバージョンですが、同時に根本的に異なります.そこで、Nexus 7 の便利な機能とヒントのリストをまとめました。
Nexus 7 (2013) のレビューを読んで、Google デバイスについて知っておくべきことをすべて確認してください。
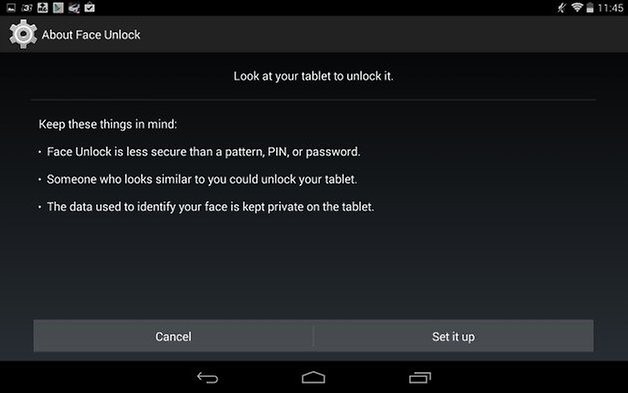
顔認証を避ける
Nexus 7 2013 は、PIN からパターン、パスワード、そして最も興味深いのは Face Unlock に至るまで、搭載されているデータを保護するための画面ロック解除方法を多数提供します。これは最もエキサイティングに思えるかもしれませんが、私はそれを避けます.なんで?すべての方法の中で最高のセキュリティ レベルを示すわけではなく、さまざまなフォーラムを読んだ後、簡単にハッキングされる可能性があるためです.
コンセプトは、デバイスを顔の高さまで持ってまばたきすることで、システムがあなたが単なる写真ではなく本物の人間であることを認識できるようにすることです。このリスクを冒しても構わないと思っている場合は、デバイスの設定、セキュリティ、最後に画面ロックの順に進むことで、簡単に設定できます。そこで、フェイスアンロックを選択できます。すぐに、この方法はパターン、PIN、またはパスワードよりも安全性が低く、同じように見える誰かがタブレットのロックを解除できることがわかります-技術が十分に進んでいない.多くの技術サイトでは、これを使用するように指示されているかもしれませんが、使用しないでください!
- 多くのユーザーは Android のセキュリティに注意を払っていません
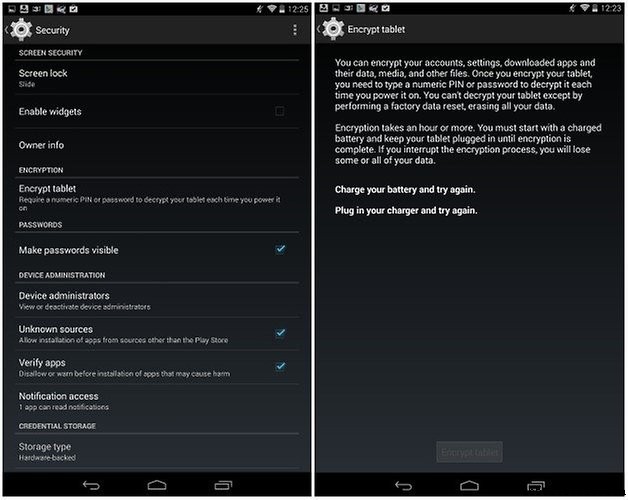
データを暗号化
ロック画面でロック解除方法を設定するだけでは不十分な場合があります。多くの泥棒は、あなたのデバイスを売ってお金を稼ぎたいだけかもしれません。このため、ユーザーはさらに一歩進んでデバイス上のデータを暗号化し、PIN でのみアクセスできるようにする必要があります。 Nexus 7 の設定に移動し、[セキュリティ]、[タブレットの暗号化] の順にタップします。デバイスの暗号化には 1 時間以上かかるため、バッテリーを完全に充電し、電源に接続したままにしておくことをお勧めします。暗号化が中断されるとデータが失われる可能性があるためです。
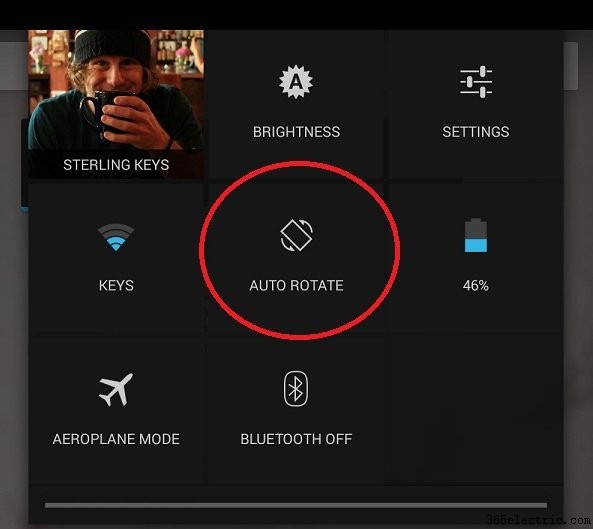
ディスプレイの自動回転を有効にする
少し直感に反するように思えるかもしれませんが、Nexus 7 ではデフォルトでディスプレイの回転が有効になっていません。通常のスマートフォンよりもはるかに大きな画面です。
これを修正する非常に簡単な方法があり、携帯電話を横向きまたは縦向きに保持したい向きに画面を自由に調整できます。画面の右上から下にスワイプするだけで、クイック設定が表示されます (多くのユーザーはクイック設定にアクセスする方法さえ知らないので、これ自体がヒントになるかもしれません!) そして、自動回転 をタップするだけです。 四角をクリックして、この機能を有効または無効にします。出来上がり!
画面ズームを有効にする
写真を表示するなど、Web サイトから特定のコンテンツをピックアップしようとしているときに、詳細を選択したり、ズームインしたりしたい場合があります。さて、画面ズーム機能を使用すると、画面の周りをホバリングする「想像上の虫眼鏡」を表示できます。
これは、ユニバーサル アクセスに移動することで有効にできます 設定で拡大ジェスチャーを選択します オプション。オンにすると、画面を 3 回タップするたびに画面が拡大され、ピンチ ツー ズーム ジェスチャを使用して画面をさらに拡大できます。通常の画面に戻るには、もう一度画面をトリプルタップして通常に戻します。
Need more tips? Find out how to make your Nexus 7 awesome again.
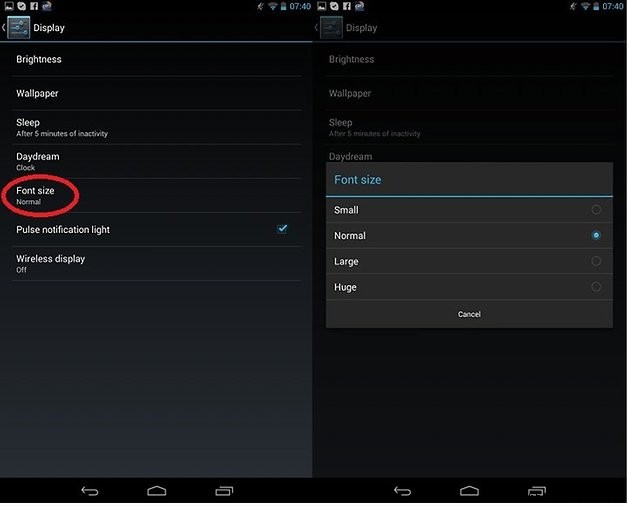
Larger Text
It is not really intuitive to hold your tablet extremely close to your face, such as is the case with most smartphones. Since it makes more sense to hold this larger device further away from you for reading purposes, it is also common to find situations where the text size displayed is often too small to be read at a comfortable distance. You can increase the default text size through your settings to combat this annoyance and make it so default text, such as display by a web browser, is automatically enlarged.
To do so, head to your settings and go to Display and Font Size , where you can choose from four sizes for your default font. Similarly, you can get the same results by going to Accessibility in your settings and and choosing the Large Text option.
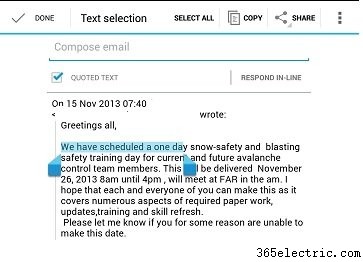
Copy and Paste
This may seem extremely trivial, but this is a very important feature when it comes to using tablets that can easily be overlooked just due to not knowing exactly how to do it. To select a portion of text that you want to use, just hold your finger over it for about two seconds. This will then highlight the text and a bunch of options will pop up at the top of your screen, such as copy, paste, cut, and more.
If you want to expand or constrict your highlighted portion of text, just use the two marking edges and drag them to the desired length that you want. It is hard to believe that there was a time on smartphones and tablets that this wasn’t even a standard feature.
- Do you feel your Google tablet is getting slow? Here are ways to speed up your Nexus 7.
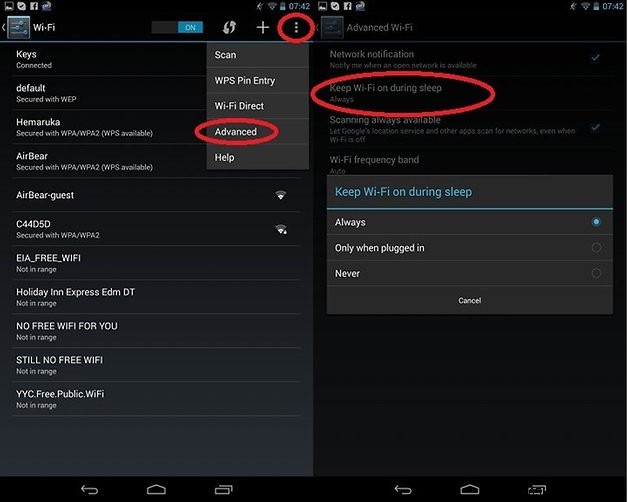
Disable WiFi during sleep mode
WiFi is a power hungry beast when it is being used, but did you know that by default that WiFi is still active, even when you’re not using your device or it is the middle of the night? Thankfully, your Nexus 7 has the option to disable using WiFi during these times that you can control.
If you head to your WLAN settings and then tap in the top right corner and choose Advanced , you’ll see a slew of options to choose from. By clicking on Keep WiFi on during sleep , you can choose from either having it on all the time, only when the device is plugged in, or never.
Keep in mind, this will limit the connectivity of the device so if you rely on WiFi to get messages or push notifications, you won’t receive them again until you physically wake the device up.
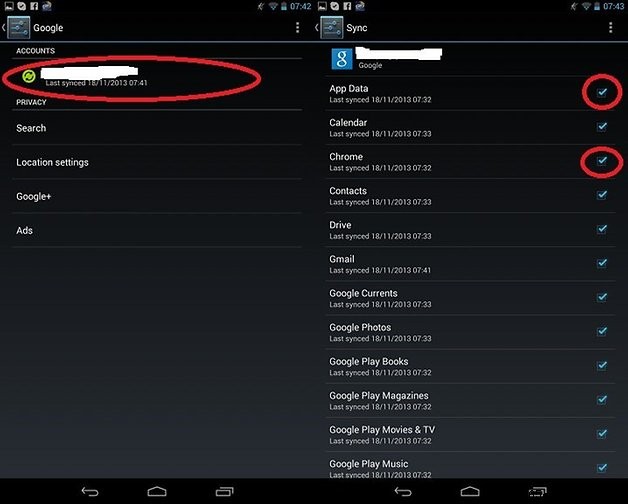
Disable auto sync on your accounts
Google automatically syncs all your Google accounts to your Nexus device, such as Google+, Gmail, and app data. This can be a bit cumbersome if you don’t necessarily want or need all that stuff on your device or just want to keep it separate, due to multiple accounts or whatnot.
In your settings, you can head down to the Accounts area and click on whichever one you want to modify. In this case, we chose Google . From there, you can then unclick all the data that you don’t want synced on this device automatically, whether it be Google Calendar items or even Google Photos.
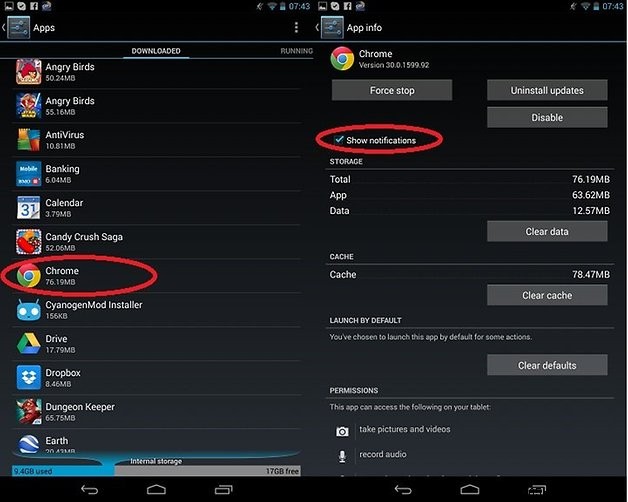
Disable app notifications
Do you have apps in which you constantly receive notifications from, but you really don’t want to see them anymore? If you head to the Apps portion of settings, you can select the offending app from the list of installed apps and then just uncheck the Show Notifications option just at the top of the opened page. That’s all it takes to remove the ability for that app to continue sending you notifications.
So, those are some of our favorite little tid-bits for the Nexus 7. What are some of yours? Feel free to share them below in the comment section!