天井スピーカーをアンプに接続する方法
シーリング スピーカーは、フロア スペースが混雑することを心配することなく、部屋をサラウンド ミュージックで満たす優れた方法です。さらに、アンプを追加すると、その余分なブーストで体験がさらにスリリングになります。この記事では、天井スピーカーをアンプに接続する方法について説明します。
天井スピーカーをアンプに接続する方法
シーリング スピーカーは、従来、左右のチャンネルのみを使用するアンプで動作するように設計されてきました。したがって、天井スピーカーのペアを購入し、ステレオ ペアとしてアンプに接続するのがより一般的です。
ただし、天井スピーカーのペアを配線することは、特に小さな部屋に天井スピーカーを設置する必要がある場合など、すべての場合に実用的であるとは限りません。したがって、このような場合は、単一のステレオ スピーカーが最も理想的です。 1 つのステレオ シーリング スピーカーをアンプに配線するには、2 本のケーブルが必要です。
シーリング スピーカーにはどのスピーカー ケーブルを使用すればよいですか?
スピーカーをアンプに配線するときは、適切なスピーカーケーブルを選択することが不可欠です。これは、インピーダンス レベルが異なるため、ワイヤが異なれば動作も異なるためです。
16 ゲージ 2 コア スピーカー ケーブルは、業界標準のスピーカー インストールとして一般的に使用されています。ただし、必要なケーブル配線が約 35 メートルの場合、これはより効率的です。ケーブルが遠すぎるとオーディオ信号が急速に劣化するため、より長い距離を使用するには、より高品質のケーブルを検討することが不可欠です。
しかし、シーリング スピーカーにはアンプが必要ですか?
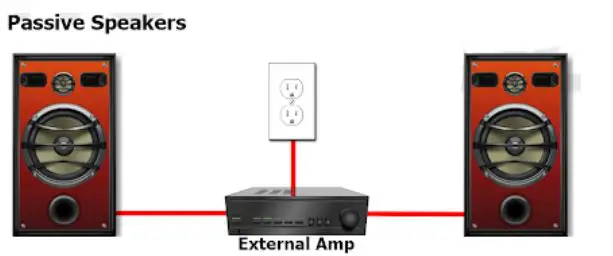
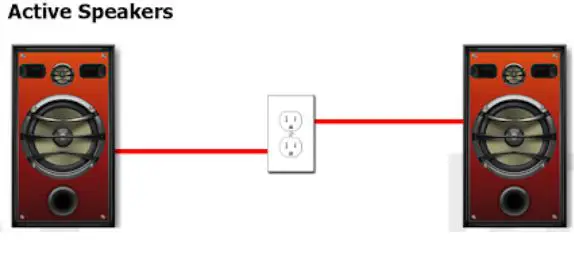
シーリング スピーカーは通常パッシブです (パッシブ スピーカーとアクティブ スピーカーの詳細をご覧ください)。つまり、アンプへの接続が必要になります。一方、アクティブ シーリング スピーカーはアンプが内蔵されているため、アンプは必要ありません。
ただし、マルチチャンネル サラウンド サウンド システムを使用可能な天井スピーカーにルーティングするつもりであるとします。
その場合、より良い方法でサウンドを出力するためのアンプが必要になります。
詳細については、天井埋め込み型スピーカー用のアンプが必要かどうかに関する記事をご覧ください。
ただし、接続を行う前に、いくつかの要因を考慮する必要があります。 3 つの重要な要素は次のとおりです。
1.スピーカーの位置
リビングルームに設置されている場合は、シーリングスピーカーの配線がはるかに簡単になります.また、天井スピーカーからアンプまでの距離は、スピーカーを天井に設置した位置によって決まります。
2.モノまたはシングル ステレオ シーリング スピーカー?
シーリング スピーカーは、伝統的にステレオ レシーバーで動作するように設計されています。ただし、スペースが限られており、スピーカーのペアを配線できない場合は、モノラル アンプを使用します。
3.スピーカー評価
考慮すべきもう 1 つの要因は、スピーカーの評価です。これらには、インピーダンスと電力定格が含まれます。スピーカーのインピーダンスは、アンプとの適切なマッチングにとって非常に重要です。
天井スピーカーをアンプに接続する方法ステップバイステップ
ステップ 1:材料を組み立てる
シーリングスピーカーをアンプにシームレスに簡単に接続できます。ただし、この接続を実現するには、適切なツールを組み立てる必要があります。 Here’s a list of what you need:
- An amplifier
- Fish tape or coat hunger
- Flat bit
- Gloves
- Level
- Keyhole or drywall saw
- Philips screwdriver
- Wire strippers
You can have your ceiling speakers wired to an amplifier by sound professionals. However, you can still have the connection through the DIY procedure. If you intend a DIY, take preventive measures such as turning off all mains powers and wearing protective gear for the hands, eye, and legs. 
Before routing the amplifier, you should plan the location to ensure it is well placed, stable, and secure. The location of the amplifier should be strategic for ease of control. Also, if you have a modern amplifier with remote control features such as Wi-Fi, Bluetooth, or Alexa, stationing the amplifier in proximity for ease of navigation by remote or voice is very important.
You should also measure the distance to the amp to establish the length of wire needed to connect the amp to the ceiling speakers. Remember, two runs of speaker wires will be required for stereo installation.
Step 2:Run The Wires
Once the distance and length of speaker wires are established, you can run the UL2 wire from the location of the amplifier to the area of the ceiling speakers.
Running the wires to the ceiling is much easier in new constructions. However, if you are dealing with an old building, you may need to drill holes through support beams to pass the wire to your preferred locations.
Once the wire is connected, leave behind an extra coil of wire at the point where the speakers are located.
Step 3:Prepare The Ceiling Speaker For Connection
Begin by cutting the drywall behind the point where you intend to connect the amp. Pull out the ceiling speakers from their brackets.
Locate the color-coded terminals and connect the red and black wires. Ensure that the colors on the cables are appropriately matched with the speaker terminals. Also, it would help if you secured the connections to avoid the wires coming out during the speaker operation.
Once the connection is secure, return the speakers safely and securely and seal the brackets back again. Ensure that the cables are firmly fixed. Once this is successful, seal the drywall and fill it in place.
Step 4:Run The Wires To The Amplifier
Once the red and black speaker wires are connected to the ceiling speakers, run them through the wall into the terminals of the amplifier. Considering the distance between the devices, you can choose to run the wires along the wall through the floor. Safely pass them under the carpet to ensure they remain safe on the floor.
Also, ensure that the colors are correctly matched.
Step 5:Test The Connection
Once all the devices are correctly connected, test that the amplifier can play music and output it through the ceiling speakers. If the speakers cannot produce sound, it is essential to troubleshoot the connection before sealing back the speakers.
Step 6:Seal And Paint
Once the ceiling speakers are appropriately wired to the amplifier, seal the spaces around them with tape. Additionally, you can paint the area to add more finishing touches for extra style. Besides, for additional glamor and blending with room décor, you paint the ceiling speakers so that they can seamlessly integrate with the wall and ceiling again.
Amplifier For Ceiling Speakers
Finding the right amplifier for ceiling speakers is quite a similar process to finding the right amp for a passive speaker. You will be looking for similar features but considering highly the impedance compatibility and power output.
Here are some of the top bets for your ceiling speakers.
1. Best Budget:Sony STR-DH790
- Compact
- 4 HDMI inputs and one HDMI ARC output
- 4k/60 Hz pass-through support
- Compatible with 6-16 ohm speakers
Pros
- Affordable
- 7 speaker terminals
- FM tuner
- Bluetooth connectivity
Cons
- Lacks Wi-Fi
- Only 4 HDMI inputs
- No preamp outputs
2. Best Under $1000:Marantz SR5014
- 8 HDMI inputs and 2 HDMI out ports
- HDCP 2.3 compliant ports
- Additional features include Bluetooth connectivity and AM/FM tuners
Pros
- Comes with a calibration mic and a setup assistant
- Multiple digital/analog audio inputs
- 7 speaker terminals
- 2 subwoofer pre-outs
- Wi-Fi and Bluetooth connectivity
Cons
- All the ports are still HDMI 2.0
What Do You Plug Ceiling Speakers Into?
An external amplifier should power all the ceiling speakers. Standard speaker cables make the connection.
Amplifier For Ceiling Speakers
<オール>It is versatile, clean design, and is compact. The Sony STR-DH790 is classified as 7.2 and supports Dolby Atmos and DTS:X. You can therefore use it in the 5.1.2 configuration for two ceiling speakers.
Pros
- Affordable
- Fully-featured remote and mic available
- All HDMI inputs support 4K/60Hz pass-through
- Seven speaker terminals and two subwoofer pre-outs
- Minimum RMS output – 90W per channel
- Compatible with 6-16 ohm speakers.
- Bluetooth supported
Cons
- Lacks Wi-Fi
- Only 4 HDMI inputs
- Not compatible with 4ohm speakers
- No preamp outputs.
Other amplifiers for ceiling speakers you can choose from include:
<オール>