4 チャンネル アンプを前後のスピーカーに接続する方法
4チャンネルのアンプを追加するのは素晴らしいアイデアです。所有している 4 チャンネル アンプを使用して、何年もの間、車内でパワフルでクリアなサウンドを楽しんできました。
しかし、どのように接続しますか?
このガイドでは、4 チャンネルのアンプをフロントとリアのスピーカーに接続する方法を紹介します。あなたと同じような車両に何百ものアンプを取り付けた後、素晴らしい結果を得るために必要な基本的なヒントを共有します.
ご心配なく。ほとんどの場合、自分でできますそして 予算内でプロフェッショナルな結果を手に入れましょう!
インフォグラフィック – 4 チャンネル アンプの接続方法 (ヒントと一般的なガイド)
まずは基本
これを読んでいる方は、アンプの取り付け、配線の接続、および車両への 4 チャンネル アンプの接続に関するその他の詳細に慣れていない可能性が高いです。
誰もが以前にカー ステレオ機器を設置したことがあるわけではないので、できる限り徹底的に説明し、あなたがどれだけ知っているかについての仮定を避けます。
4チャンネルアンプとは?
今日の 4 チャンネル アンプは、以前よりも新しいテクノロジー、優れたサウンド、コンパクトなサイズを提供します。優れた例は です アルパイン MRV-F300 50W x 4 モデル クラス D テクノロジーを使用して非常に低温で動作しますが、車やトラックのシートの下に収まるほど小さいです。とてもいいですね!
4 チャンネルのカー アンプが何であるかは、最初は明白に思えるかもしれませんが、もう少し知っておくべきことがあります。さらに、2 チャンネルのアンプとは異なる興味深い (そして良い) 点がいくつかあります。
実際、フロント スピーカーとリア スピーカーに電力を供給するために、2 つのステレオ アンプの代わりに 1 つの 4 チャンネル アンプを使用することで得られるいくつかの利点があります。
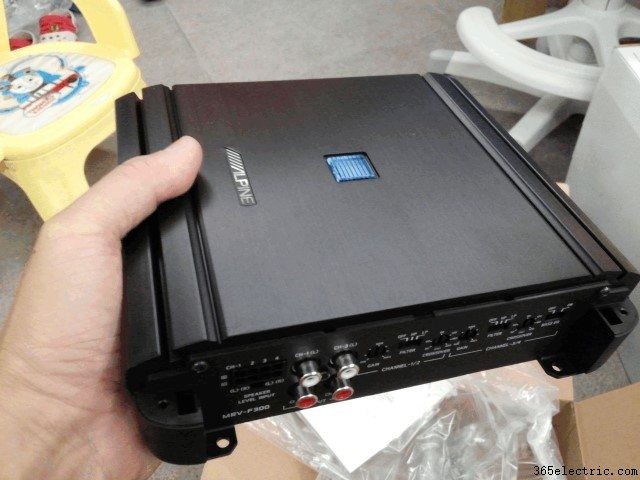
4 チャンネル アンプは、微弱な入力信号をより高い電圧の信号にブースト (増幅) するために、さらに 2 つのチャンネルが組み込まれたステレオ アンプです。これにより、スピーカー ボイス コイルが駆動され、スピーカー コーンが移動し、サウンドが生成されます。4 チャンネルのアンプは、個別のアンプよりもコンパクトで効率的な設計により多くのチャンネルを追加します。
さらに、4 つのチャネルすべてが必要ない場合に、より多くの電力を供給できる「ブリッジ」操作用に構成できるため、柔軟性が向上します。
アンプの「ブリッジ」とは?
ブリッジ モード機能 は、「プッシュプル」セットアップが作成される特別な設計機能です。1 つのチャネル (通常は左スピーカーに使用) は、2 番目のチャネル (通常は右スピーカーに使用) とは反対の信号を生成します。
これにより、スピーカーは差の電圧音声波形を受信します。 2 つのチャンネル間で、スピーカーにより多くの電力を供給できます。
基本的に、ブリッジ モードは、4 つのスピーカーを駆動していない場合に、より多くの電力を得る柔軟な方法です。これは、2 つのチャンネルが 1 つのスピーカーのワークロードを共有していることを意味し、したがって、より多くのパワーでスピーカーを駆動します。
2 チャンネルと 4 チャンネルのアンプ図
4 チャンネル カー アンプは、基本的に 2 チャンネル アンプの拡張バージョンです。ただし、2 チャンネルのアンプを 2 つ別々に構築するのではなく、2 チャンネルのアンプを組み合わせて構築しているため、よりコンパクトになります。これにより、設置スペースが節約され、設置も簡単になります。さらに、ほとんどは 2 つのチャンネル (必要に応じて 3 つ) を使用するようにブリッジできるため、4 つのスピーカーのみで使用することに制限されません。
アンプを使用してスピーカーを駆動する利点
工場出荷時のステレオであろうと、優れたアフターマーケット (非工場出荷) のステレオであろうと、アンプを追加することは最善の決定の 1 つです。
インダッシュ ステレオはとても 発電できる電力には限りがあります。彼らは、優れたアンプと同じ明瞭さと低歪みでスピーカーをドライブすることはできません。
スピーカーから得られる最大音量もかなり低くなります。
これを回避する方法はありません。ほとんどのインダッシュ ステレオは、各スピーカー チャンネルの電力が約 15W ~ 18W RMS に制限されています。これは、+12V 電源から直接実行されているためです。アンプは、+12V の電源を取り、それをより高い電圧に昇圧するという点で独特です。信号がブーストされて車のスピーカーに送信されると、電圧がはるかに高くなり、スピーカーはより多くの電力を受け取ることができます。
そのため、小さなアンプを気にする価値はほとんどありません。内部に特別な電源がなければ、単に多くの電力を生成することができません.
素晴らしいサウンドを得る
アンプからスピーカーに電力を供給すると大きな この方法で何年も優れたサウンドを楽しんできました。
アンプが車両のスピーカーを駆動するとき、多くの場合、アンプは限界まで押し上げられることさえありません。スピーカーで生成される音は歪みが少なく、重低音を再生しても「底抜け」せず、多くの音を得ることができます ボリュームもアップ!
さらに、内蔵のハイパス クロスオーバーを備えたアンプを使用すると、スピーカーの歪みの原因となるローエンドの低音をブロックして、スピーカーに適していない音楽トーンを再生しようとすることができます。
その結果、よりクリーンなサウンドになり、歪みが少なくなり、大きな音量になります。音楽をさらに高くすることができます!
窓を開けて車を運転していて、大好きな音楽を大音量で流しているところを想像してみてください。私と同じくらい気に入っていただけると確信しています。
始める前に知っておくべきこと

必要なパーツ、ワイヤー、ツール、その他の小物のリストを作成するのに数分しかかかりません.事前に計画することで、システムを大きな問題なく稼働させるか、イライラする時間を過ごすか、または完全に失敗するかの違いを意味する可能性があります。私は仕事を始める前に常に整理整頓を行い、アイテムをまとめます。
事前の計画はとても 重要です。 たとえば、配線が不足したり、適切な部品がないことに気付きたくはありません。それは、プロジェクトを完了できないことを意味します。
さらに悪い 街中を車で探し回ったり、閉店して何もできなくなった時。私を信じてください、私はそこにいました、そしてそれはひどいです!
ワイヤー、ツール、その他の注意事項
設置に関しては、配線が不足するのではなく、常に配線が増えるように計画してください。 これは、RCA ケーブルだけでなく、スピーカー ワイヤにも当てはまります。
私がお勧めするアンプキットは、アンプの設置に適した長さですが、この場合、スピーカーワイヤーと RCA ケーブルは別の問題です.
必要なスピーカー ワイヤーの長さとサイズは?

スピーカー ワイヤーに多額の費用をかける必要はありません。多くの場合、18 ゲージで十分ですが、価格が適切な場合は 16 ゲージも最適です。良い例は、この AmazonBasics 100 フィート ロールです。多くの場合、4 チャンネル アンプの設置には 100 フィート ロールをお勧めします (理由は以下をご覧ください)。
これは、必要なスピーカー ワイヤの長さに関する最悪のシナリオの見積もりです。スピーカー レベル入力を使用してアンプを取り付ける例を使用します。次の一般的な取り付け方法を使用します。
- アンプはトランクにあります
- ラジオ (センター コンソール) 近くのスピーカー レベル信号接続
ラジオからアンプまでの距離はおよそ 15 フィートです。私の経験上、これは良い見積もりです。
- ラジオからアンプへの配線 (信号線):4 チャンネル x 15 フィート =60 フィート
- ラジオの近くのアンプからスピーカーへの配線:4 チャンネル x 15 フィート =60 フィート
必要な推定ワイヤーの合計:120 フィート。
つまり、100 フィートのワイヤー ロールが 2 つ必要です。または、少なくとも、1 100 フィート ロールと 1 50 フィート ロール。ラインレベルのアダプターを使用する予定がある場合は、100 インチのロールを手に入れることを期待してください.
設置に RCA ジャックを使用している場合は、100 フィートのロールも期待できます (4 チャンネル x アンプからのスピーカー ワイヤの推定長さ 15 フィート)。
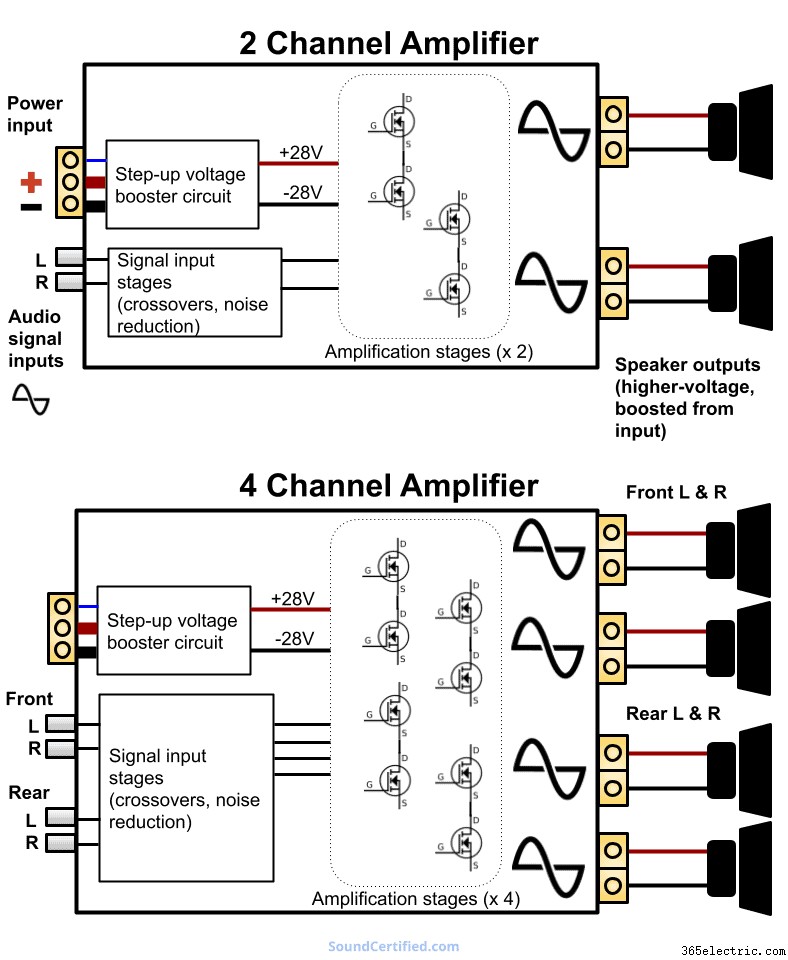
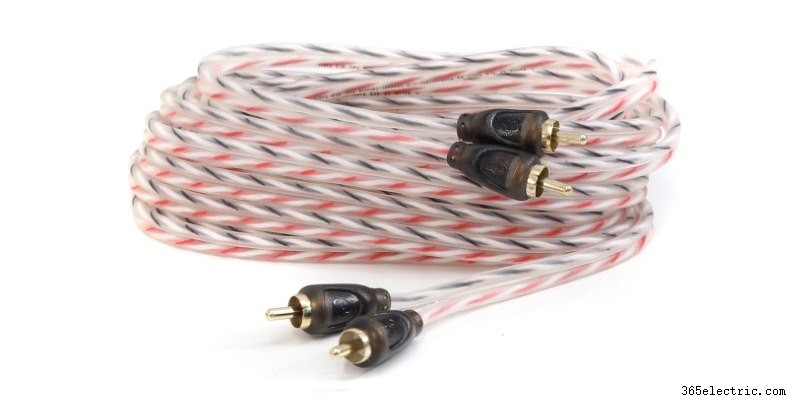
RCAケーブルはどうですか?
 4 チャンネルのアンプをインストールして RCA ケーブル接続を使用する場合は、2 つ目のペアを購入する必要があります。ほとんどのキットには 2 チャンネルのケーブルしか含まれていないため、アンプの配線キットと一緒に使用してください。
ほとんどの設置では、長さ 18 フィートのケーブルをお勧めします。これは通常、ほとんどの車両に十分な長さであり、ケーブルを内部や後部座席の下などに隠すのに十分な長さを確保する必要があります.
余計なお金をかける理由にはなりません。良質でよくできたケーブルを手に入れてください。このようなお手頃価格のペアでも、ほとんどの場合問題ありません。
必要なツール
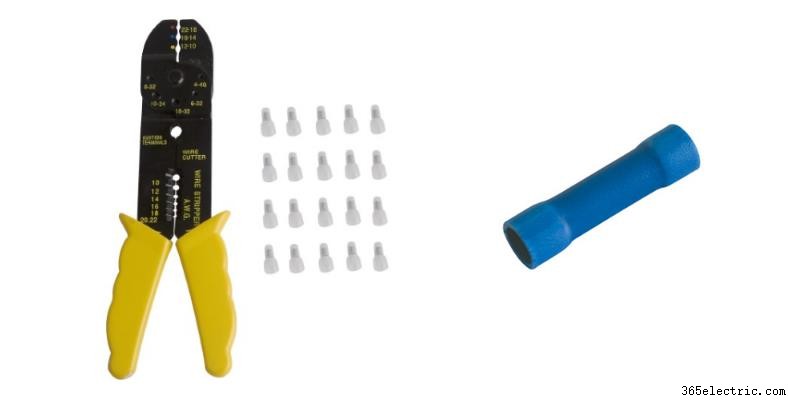 圧着工具は、アンプとスピーカーの配線をプロフェッショナルな仕上がりで取り付けるのに最適です。自分で取り付けを行う場合は、この Pros'Kit 圧着工具のような安価な工具で十分です。圧着コネクタは、多くの自動車部品店や雑貨店で別売りされており、非常に手頃な価格です。
いくつかのツールをお勧めします。慎重に買い物をすれば、ツールの価格にだまされることを避けることができます。スピーカーの配線を工場の配線に接続するときは、はんだよりも圧着コネクタを使用する方が簡単です。
単純にワイヤをねじって絶縁テープで包むことは絶対にしないでください。常に信頼できる接続を使用してください。
暖かい季節には、電気テープの接着剤が壊れて、テープがワイヤーから剥がれることがあります。これにより、ショートする可能性があり、ラジオやアンプが損傷する可能性があります。
コードレスドリルを利用できるなら、それは素晴らしいことです!車両の金属に穴を開けてアンプを取り付けたり、アース線をベアメタルに接続したりするのに最適です。
以下もお勧めします:
- ワイヤ カッター (一部の圧着工具にはこれが組み込まれています)
- 高品質の電気テープのロール
- ワイヤー タイ (「結束バンド」)、長さ 6 インチ、100 個入りバッグ
- 電圧測定用のデジタル テスト メーター
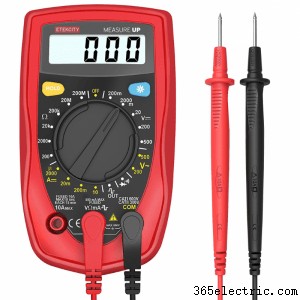
多くの場合、テスト メーターは信じられないほど アンプを取り付けるときに役立ちます。ただし、多くのお金を使う必要はありません! Amazon でのこのような基本的だが優れた予算モデル うまくいきます。
アンプへのリモートオン信号を取得するためのスイッチ +12V ワイヤーを見つけるために、手頃な価格で優れたデジタル テスト メーターを入手することをお勧めします。
また、何かが機能していないときに電源の問題をトラブルシューティングする際にも非常に役立ちます。
インストールの買い物リストをまとめる

以下は、4 チャンネル アンプをフロント スピーカーとリア スピーカーに接続するために必要なものの、一般的でかなり正確なリストです。
設置タイプ 1 または 2:工場ラジオまたは RCA 接続なし
<オール>設置タイプ 3:RCA 接続
<オール>十分に計画を立て、必要なスピーカー ワイヤーの量を見積もってください。アンプのインストール自体については、強く アンプ キット バイヤーズ ガイドに記載されているような既成のアンプ配線キットを使用することをお勧めします。
また、2 組目の RCA ケーブルを入手する必要があります。長さ18フィート以上をお勧めします。あまりお金をかけないで、まともな品質のものを手に入れてください。
アンプに信号を送る方法
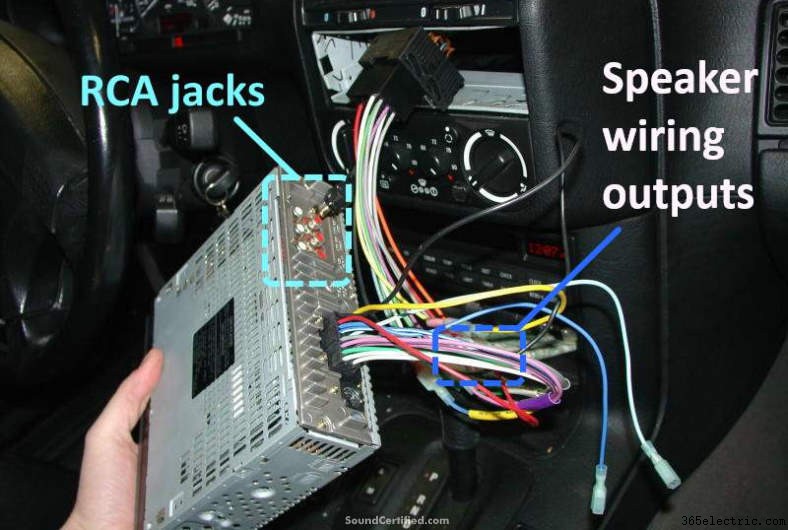
RCA ジャックとスピーカー出力配線を示すアフターマーケット (非工場) ステレオの画像。どちらも信号をアンプに送るために使用できますが、RCA ジャックの方が適しています。通常は歪みが少なく、プラグイン RCA ケーブルを使用できます。それらが利用できない場合は、スピーカー レベル入力を備えたアンプまたはライン レベル (スピーカー レベル) アダプターを使用できます。
4チャンネルのアンプを取り付けて、4つのスピーカーすべてをドライブするために多くの場合、最大の障害はアンプへの信号の取得です。 それが完了したら、残りは通常、標準的なアンプのインストールです。
4 チャンネル アンプに信号を送信するには、次の 3 つの基本的な方法があります:
<オール>その場合、私のアドバイスは、最初に優れた設置店と話し、調査を行うことです.
工場で増幅されたシステムもここにあるはずだと感じたら、私にメッセージまたはコメントを送って知らせてください
いくつかのケースでは、アンプを工場出荷時の増幅システムのオーディオ配線に接続するためのアダプターが利用可能ですが、多くの場合、それは困難であるか、開始するまで見つけられない障害があります.
その理由の 1 つは、工場で増幅されたシステムのオーディオ パスに非標準の配線接続が使用されていることが多く、適切なアダプターや配線なしでアンプを接続すると、ノイズの問題が発生しやすくなることです。
どのタイプの接続が必要ですか?
RCA ジャック付きのラジオをお持ちの場合は、スキップして次のセクションに進んでください。
ただし、RCA ジャックのないステレオをお持ちの場合 (工場で取り付けられたステレオの場合は常にそうです)、次のいずれかを購入する必要があります:
- 「ラインレベル」コンバーター
- スピーカー レベル (「高レベル」) 入力を備えたアンプ
1.ラインレベルコンバーター
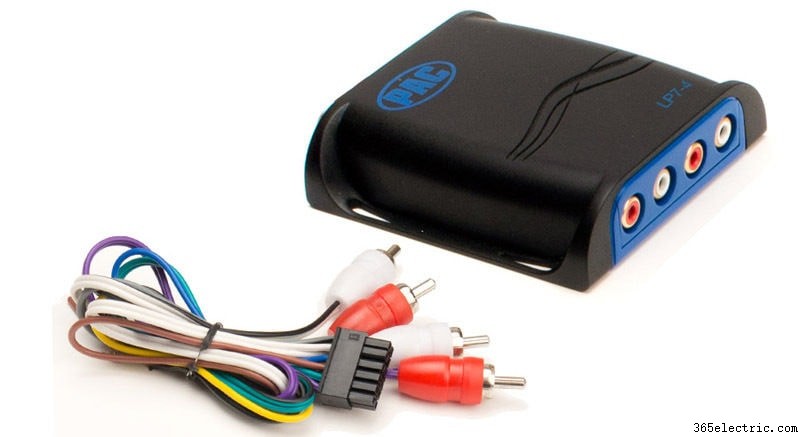
のような行レベルのコンバーター この PAC LP7-4 4 チャンネル モデル は、RCA ジャックのないステレオからスピーカー出力を取り、それらを RCA ジャックに適合させるように設計されています。これを使用して、RCA ケーブルをアンプに接続できます。
ライン レベル コンバーターは、スピーカー出力をステレオからアンプが使用できる低レベル信号に変換することで、アンプの RCA 入力に接続できるように設計されています。
ノイズ、音質の低下、その他の問題を回避するために、高品質で適切に設計されたラインレベル アダプターを購入することが非常に重要です。 最も安いものを手に入れるのではなく、信頼できる有名ブランドのモデルを手に入れましょう (上記のような)。
2.スピーカーレベル入力
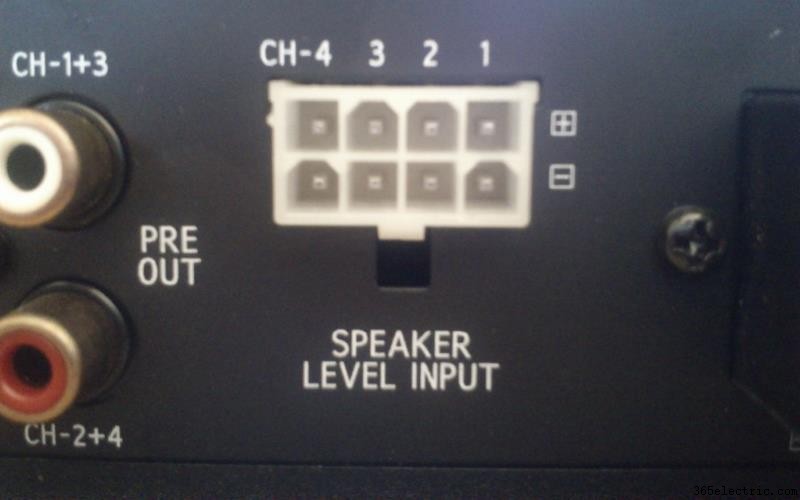
このような高レベル (スピーカー レベル) 入力を備えたアンプは、スピーカーへの接続を可能にします信号源の配線。これにより、別のアダプターを購入する必要がなくなります。
スピーカー レベル入力は、多くの 4 チャンネル アンプで一般的です。これらのアンプには、スピーカー配線信号をアンプの入力回路にとって安全な低い信号にスケールダウンする電子機器が含まれています。
接続は簡単です。通常は、付属の小さなワイヤリング ハーネスで各スピーカー チャンネルのプラス (+) とマイナス (-) の両方の配線を接続するだけです。次に、これをスピーカー レベル入力コネクタに差し込みます。
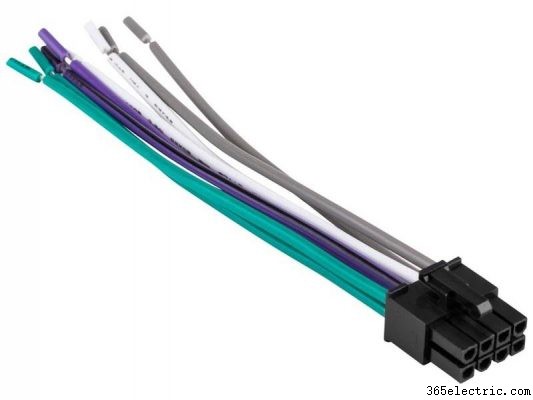
4 チャンネル アンプの典型的なスピーカー レベル入力ハーネス。ワイヤーは色分けされており、取り付けが簡単です。白 =左前、グレー =右前、緑 =左後、紫 =右後。
お金を節約できますが (この場合、ラインレベル アダプターは必要ありません)、とにかくラインレベル コンバーターの購入を検討することをお勧めします.
This allows an easier upgrade for your stereo later, which is very common for people to do. Using the line-level converter now will allow you to run RCA cables to your 4 channel amp to be used later if you buy a better stereo (which will include RCA jacks, almost always).
3. RCA jack (line-level) connections
RCA jacks offer a clean, lower-noise connection than speaker-level adapters do, but honestly, it’s not noticeable to the average person. RCA cables (line-level connections) are the preferred way to connect a signal to your amp if you have that option.
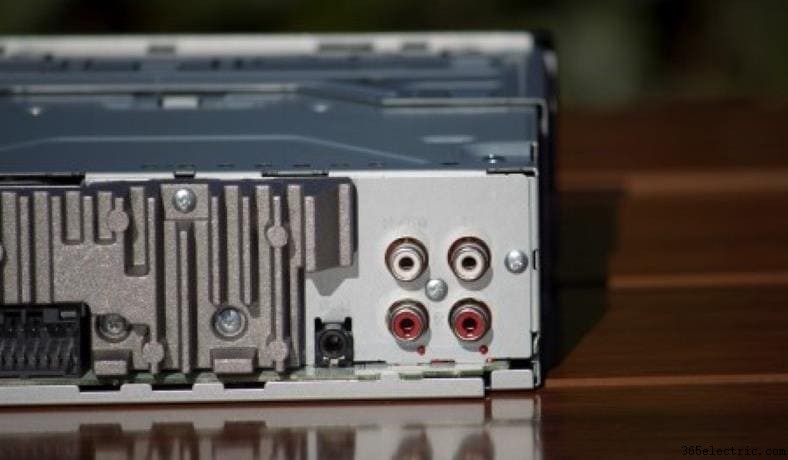
RCA jacks on the rear of a Pioneer head unit. This is the ideal way to connect your amplifier’s signal inputs, if available. For a 4 channel amplifier, you’ll need 2 stereo RCA cables to do so. White represents the left channel white red represents the right. These are standard colors for audio outputs for both car and home stereo.
If your stereo has RCA jacks, then congratulations. Things just got a bit easier – and potentially better sounding, too!
You’ll need 2 stereo RCA male-to-male cables (4 audio channels total) to run from the radio to your 4 channel amp. That’s 4 signal channels:left &right front and left &right rear.
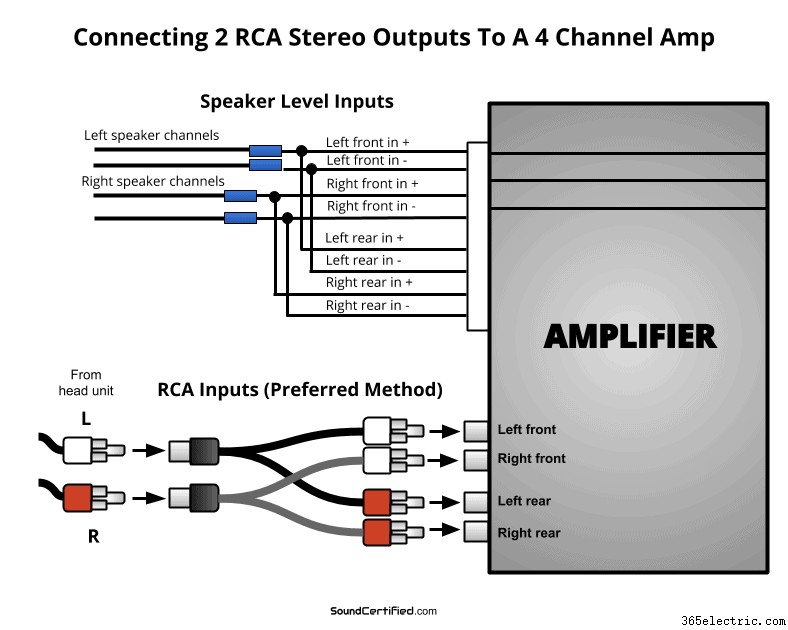
4 channel amp signal connection diagram
Here’s a helpful diagram showing the most common connections you’ll need to make one of the 3 most common cases I mentioned earlier:
<オール>
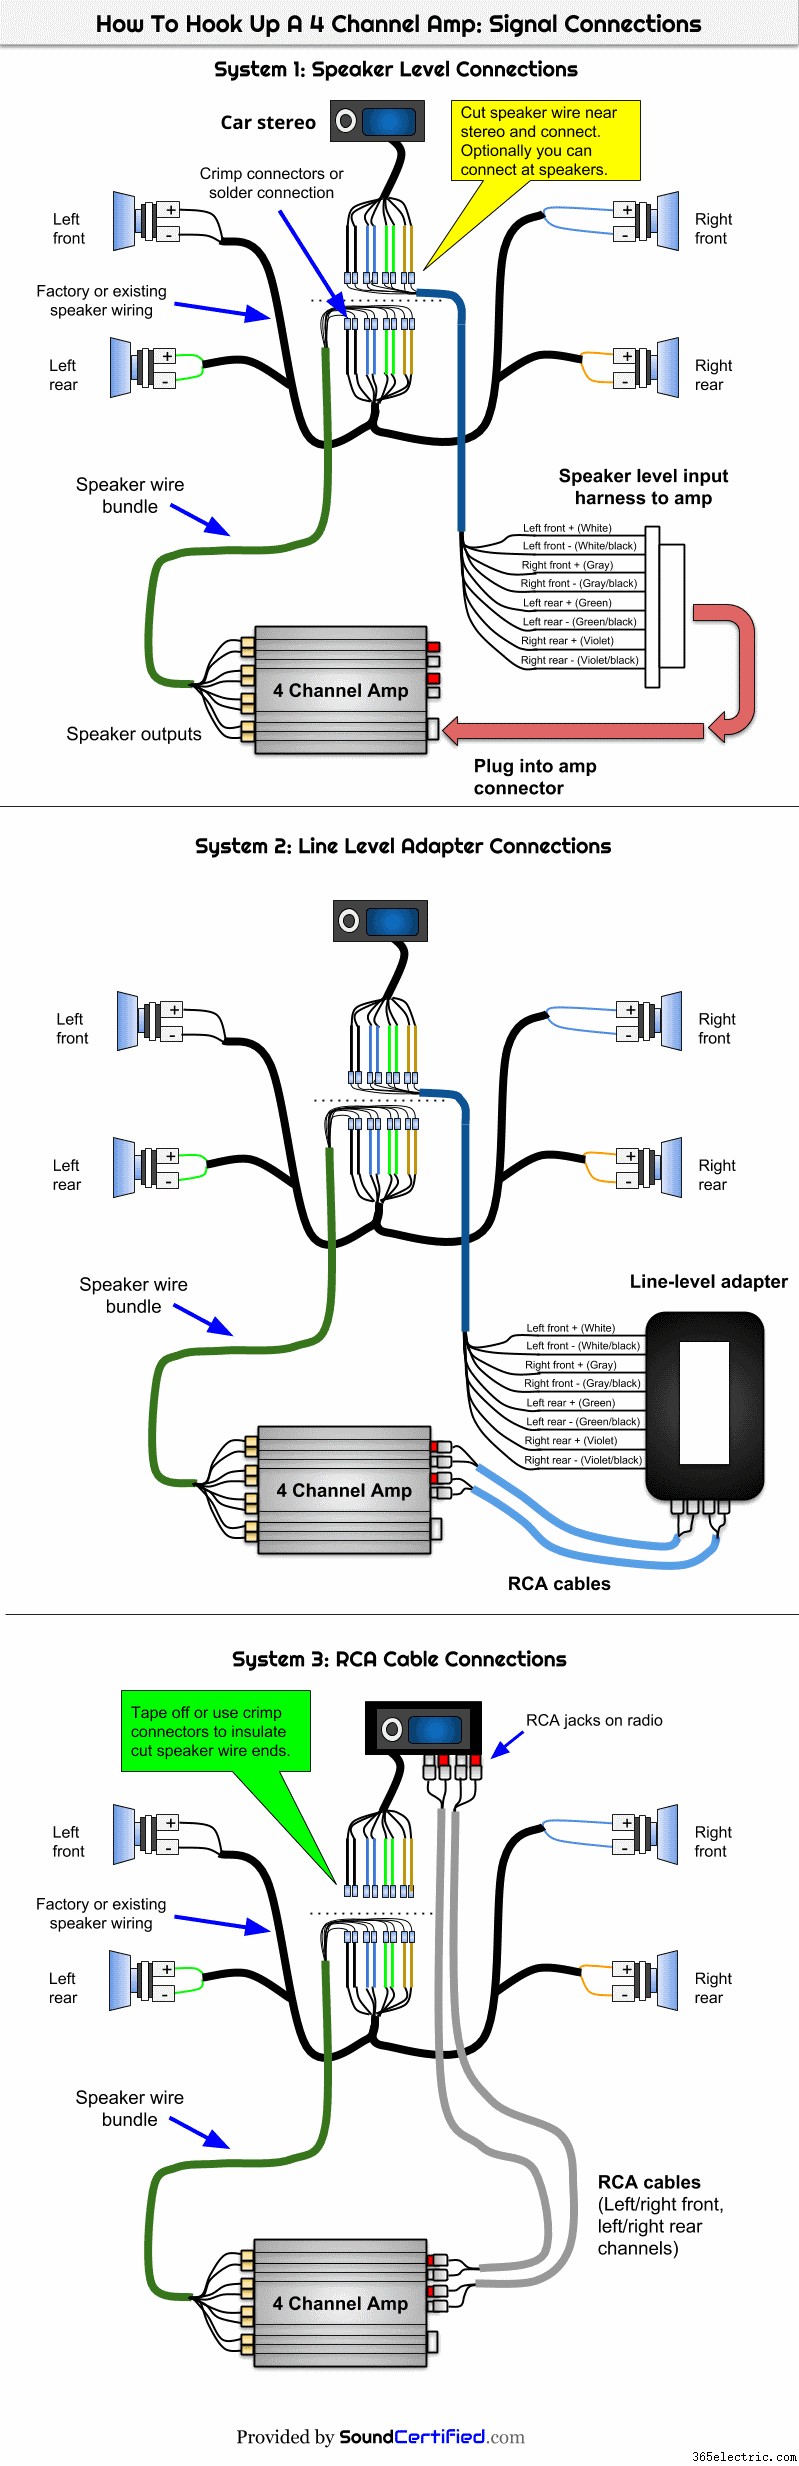
You can also click here to view the .pdf document for print or download.
Connecting and running signal wiring
Speaker-level connections
As mentioned above and as shown in the diagrams, if you’re using speaker-level outputs to get a signal from the radio, you’ll need to connect wire. Ideally, you’ll do so near close to the radio, then run the wire together as a bundle.
You can bundle speaker wire together with wire ties to keep it neat and make the installation easier.
Estimate the length of speaker wire you need to reach the amp (or line level converter) for each audio channel. To do so, run a length of wire from the radio to where the amp will be installed, then allow a little extra and enough length to run around curves and interior parts.
Cut 7 more lengths of wire, for a total of 8:
- 4 channels (4 pairs of wire) going to the amp’s speaker level inputs
- 4 channels from the amp to the radio’s factory speaker wiring
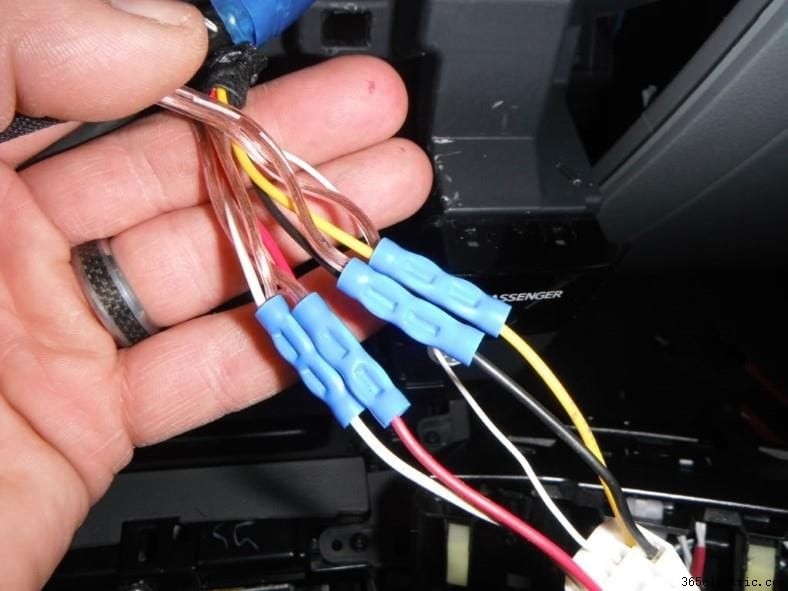
I recommend connecting to speaker-level outputs using crimp connectors and a crimp tool for a reliable, solid connection. Blue connectors are normally the right size for 18-16 gauge wire.
Factory stereo color codes
If you have a factory stereo, you’ll need to find the wiring colors for the speaker wiring.
A great resource for that is The12Volt.com, where you’ll find wiring diagrams for your vehicle and color codes listed.
Making connections
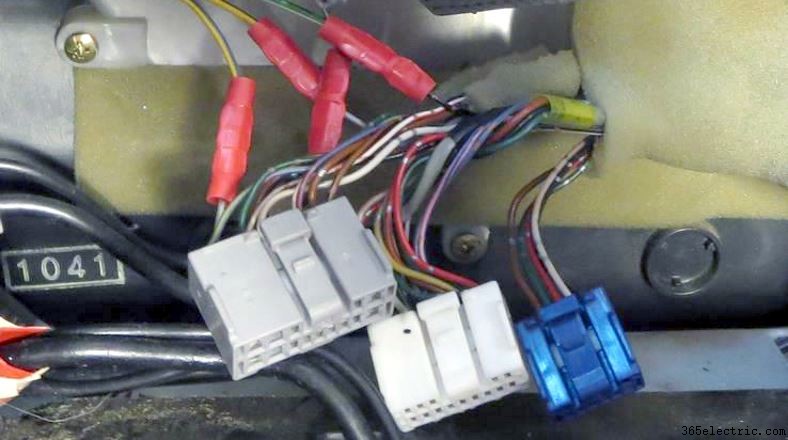
After removing the radio you’ll find connectors like this for the factory stereo wiring harness. You’ll need to separate the speaker wires, cut them, and attach wiring to run to the amp.
Remove the radio and disconnect the factory wiring plugs or aftermarket radio’s wiring harness.
Cut the speaker wires, leaving enough length to move the wire and to have enough length to connect to the wire freely.
Strip a small part on both the stereo’s speaker wire and your amp speaker wiring. If using a line-level adapter, connect to the stereo’s speaker output side. Then connect the 4 pairs of wire to the speaker wiring in the harness.
Insert the stripped wire (about 1/4″ of bare wire) into the connectors and crimp them carefully using a crimp tool if you have one. Alternately, you can twist together wire, solder it, and carefully wrap it with electrical tape or use heat shrink tubing for insulation.
If using speaker level inputs on your amp, also connect 4 pairs of wire to the output of the stereo.
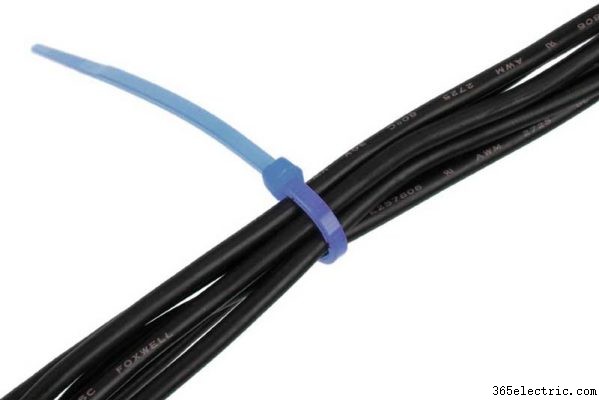
To make a neater, more professional installation, bundle the speaker wiring similar to this using wire (“zip”) ties. I recommend using 6″ ties which often are sold in packs of 100.
Once all wiring is connected, bundle it up using wire ties or, optionally, a little bit of electrical tape wrapped around. In both cases spacing out wire ties or tape about every 1″ or 1.5″ along the length of the wire works well.
Connecting RCA cables
Connecting RCA cables to an aftermarket (non-original) stereo for running to an amplifier.
If you’re using a line-level converter or have a stereo with RCA jacks, connect all 4 cables plugs to the front and rear outputs.
RCA cables are sometimes marked with left and right symbols (“L” and “R”). In some cases, white, clear, or some lighter color can be used to represent the left channel.
Connect the cables consistently so you’ll be able to recognize which one is which. If the front and rear RCA cables are the same, you might want to mark front and rear using some masking tape and a marker or pen.
Connect the remote-on amp wire
Don’t forget the remote wire! Amp wiring kits include a small wire that’s used to connect the amp so that it switches on and off with the accessory position of the ignition switch.
Locate a +12V wire that has power when the ignition is switched to “ACC” or similar but turns off with the key. You may also have good luck finding an existing wire color from vehicle wiring diagrams I mentioned earlier or from a Google search.
I recommend checking the wiring even if you have already located it online, just to be sure.
Before re-installing the radio connect this wire and run it alongside the speaker wiring.
How to connect a 2 ch. car stereo to a 4 channel amp
You can connect a head unit car stereo with only 2 channels (left and right) to a 4 channel amp easily. Ordinarily, all you need is 2 RCA Y adapter cables. The head unit’s left channel RCA jack should be connected to the left front and left rear amp inputs. Likewise for the right channel. If using speaker level inputs on the amp, use the connections shown above. NOTE: Use only ONE of the two connections above! Never connect both types at the same time! Speaker-level outputs will damage RCA connections.
If your head unit (car stereo) only has 2 RCA jacks or two pairs of speaker outputs, that’s not a problem.
As shown in the above diagram, you can connect 2 channels to a 4 channel amp using either the speaker level inputs wired in parallel or by using simple RCA adapter cables.
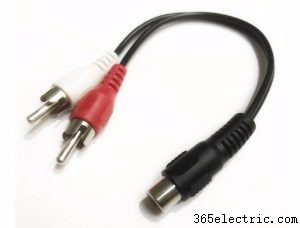
All you need is a decent pair (a total of 2) female to male RCA “Y” adapters like these low-cost ones from Amazon.
The sound quality will be exactly the same. Today’s amps are designed in such a way that there’s no harm in using a Y adapter to connect the amp. The amplifier will receive exactly the same signal, with the same quality, in the front channels as well as the rear.
The only drawback is there won’t be a front to rear fader control like with head units with 4 channels of outputs.
After connecting the stereo to the amp, you’ll need to adjust the rear gain to set the volume level for the rear speakers as needed for the proper volume depending on the stereo’s signal strength.
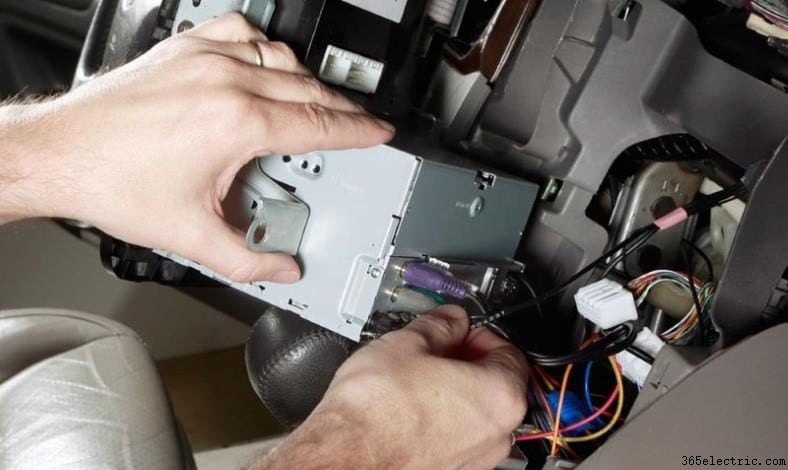
Installing the amp
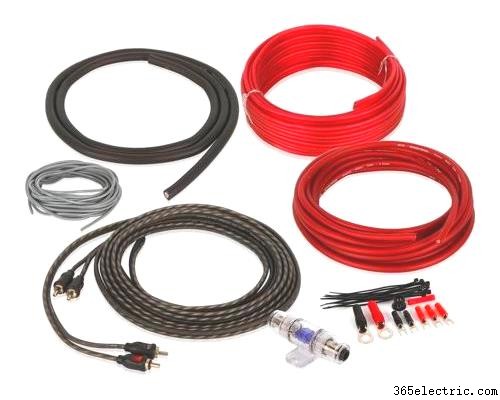 An amp wiring kit like this one will make installing your 4 channel amp much easier. A good-quality one like this Belva 8-gauge complete kit includes not just wiring but much more. You’ll also need to pick up a 2nd pair of RCA cables (if using them) and enough speaker wire.
Your amplifier needs a good solid metal connection to ground and you’ll need to run the positive battery wire to the engine compartment. Your amp wiring kit will also include a fuse holder that should be installed near the battery as well (most kits include instructions, by the way).
You’ll also need to connect the amp’s speaker outputs to the wire you ran from the radio.
As it also applies to 4 channels amps, for the amplifier installation you can follow my guides here:
- How To Install A Subwoofer And Subwoofer Amp In Your Car
- The DIY Car Amp Rack Guide
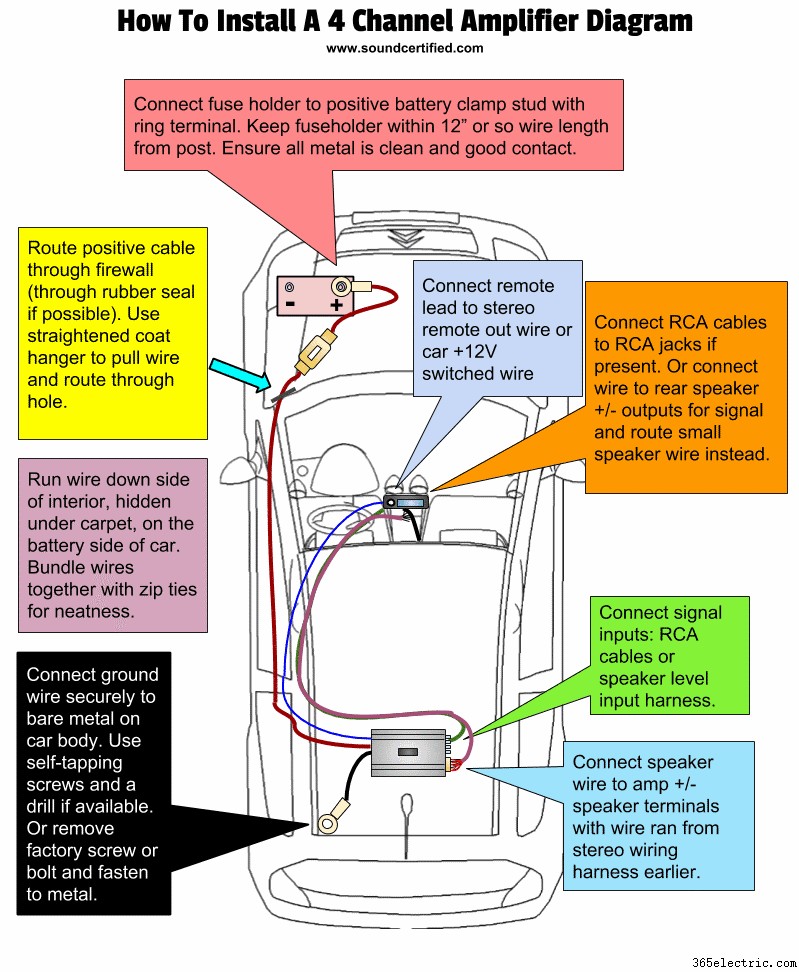
Here’s a basic diagram as well to help:
Setting up your amp
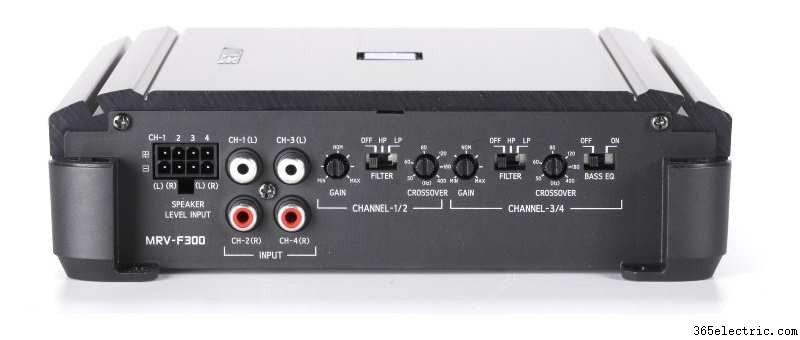 Once installed, you should set up your amp’s gain levels and crossovers for the best sound. In this image, you can see the adjustable crossovers for both front and rear channels. Turn on the high-pass crossovers and adjust to a setting close to 50-60Hz, to allow good bass for music but block low-end bass that distorts.
Once installed, you’ll need to set up your amp’s gain levels and crossovers, if available. Most sold today have that. (See my recommendations at the end for some great models)
Gain control is the amount of signal amplification the amplifier performs. Ideally, with a good input signal, it can be kept low to reduce any hiss or noise that can appear when it’s turned up high.
Here’s a great rule of thumb for how to adjust the gain for this type of system:
<オール>When finished you should have enough volume available from the stereo but noise should be minimal. You’ll still need to tweak it a bit if the volume is too high or too low.
Setting the crossover
As I mentioned at the beginning of this guide, using high-pass crossovers will allow more volume with less distortion and will help protect the speakers from heavy bass.
For both front and rear channels turn on the high-pass feature and, if an adjustable dial is available, set it near 50 to 60Hz. Some models don’t offer an adjustable frequency for the cutoff but are likely preset to a good level.
Test and tweak

Once installed, test and tweak your amplifier as needed. A great way to mount your 4 channel amp is by using a board mounted to the car, covered with speaker box carpet or other material.
Play some music you’re very familiar with and adjust things like bass, treble, and the fader as needed. Using music you’re very familiar with (of high quality) means you’ll be able to notice any problems with the sound fairly easily.
If you don’t already have one, you might consider later upgrading to a head unit with built-in equalizer (EQ) functions to help tailor the sound.
Summary and recommended products
Hopefully you’ve found this post useful. Hooking up a 4 channel amp to your front and rear speakers takes some work and time, but it’s a great way to get sound you’ll love.
Considering buying an amplifier? You can find some great 4 channel amps (including the Alpine MRV-F300 pictured here) in my 4 channel amp buyer’s guide.
You’ll also need a good amp wiring kit – I’ve got a good amp kit buyer’s guide here.