Audacity で曲をミックスする方法
オーディオ編集ソフトウェアで曲をミキシングするには、素材 (音楽の個々のトラック) を完璧な比率でブレンドして、おいしい最終プロジェクトに仕上げます。ただし、従うべきマスターレシピがないため、パイほど簡単ではありません.Audacityのオープンプラットフォームは、強力な商用アプリケーションに取って代わるものではありません.ただし、トラック間のレベルのバランスを取り、イコライゼーションを追加する機能はサポートしています 、圧縮 およびミキシング プロセスで一般的に使用されるその他のエフェクトを適用し、最終的にすべてのトラックを 1 つのステレオ トラックに結合して、再生可能なデジタル ソング フォーマットにエクスポートします。
編集中
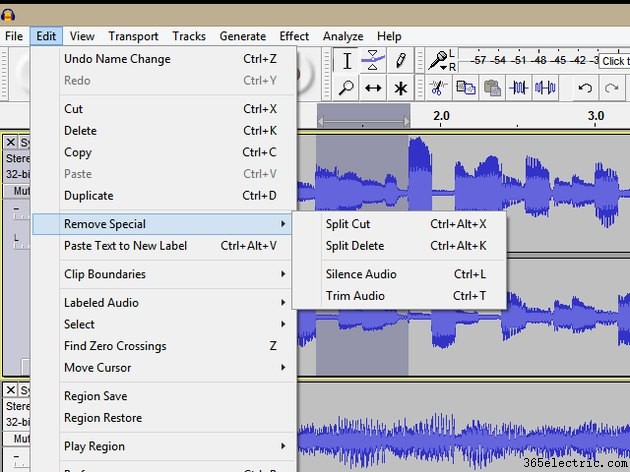
最終的なミックスで不要なセクションを削除またはミュートします。たとえば、Audacity の選択ツールと編集ツールを使用して、ファイルの先頭と末尾をトリミングしたり、静かなセクションや不要なセクションを削除したりできます。バックグラウンド ノイズは複数のトラックにまたがる可能性があるため、これはプロジェクトの最高の品質を確保するための適切なハウスキーピング プラクティスです。オーディオのセクションを選択し、[編集] をクリックして、Audacity の編集ツールにアクセスします。 をクリックし、適切な編集を選択します。 スペシャルを削除をクリックする 最も強力な編集オプションにアクセスします。これらには以下が含まれます:
- スプリット カット -- Ctrl-Alt-X を使用してアクセスすることもできます キーの組み合わせ、Split Cut はハイライトされたオーディオを削除し、クリップボードに配置します。ハイライトされたセクションの両側のオーディオはそのまま残ります。このオプションは、オーディオ トラックをクリップと呼ばれる断片に分割します。
- 分割削除 -- Ctrl-Alt-K を使用 キーボードショートカットとして。 Split Delete は、カットされたオーディオをクリップボードに置かずに、Split Cut と同じことを行います。
- 無音 -- このオプションは、選択範囲を無音に置き換えます。これは、トラックを 1 つの連続したクリップに保持するのに役立ちます。このためのキーボード コマンドは Ctrl-L です .
- 音声をトリミング -- 選択したオーディオの前後のオーディオをすばやく削除したい場合、このオプションを選択すると、ハイライトしたものはすべて保持され、残りは削除されます。 Ctrl+T キーボードからオプションを有効にします。
ヒント
カット (Ctrl-X) などの標準的な Audacity 編集を使用する 削除 (Ctrl-K) 選択したオーディオを削除しますが、作成された穴は、選択範囲の右側のオーディオを左に移動すると削除されます。これにより、オーディオが他のトラックと同期しなくなる可能性があります。
オーディオの強化
イコライゼーション、コンプレッション、リバーブはそれぞれ、最終的なミックス内でブレンドまたはトラックを分離することによって、ミックス内のパーツをまとめるために使用されます。チューニングと装飾もこれら 3 つの効果に限定されません。 Audacity には、トラックで使用できる 40 を超えるエフェクトが含まれています。このミキシング段階にアプローチする標準的な方法はありませんが、レコーディング テクノロジー マガジン Sound On Sound ミックスにアプローチするときの 4 部構成のシーケンスを提案します:
- ダイナミクス
- 均等化
- リバーブ
- パン
この順序は出発点であることに注意してください。すべてのステップを使用する必要はありません。あなたの耳が最終的な権威であるべきです.
ダイナミクス
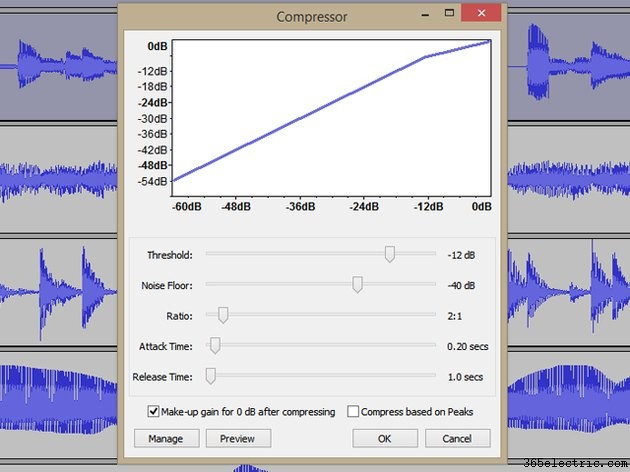
大まかなミックスを作成するために各トラックのボリュームを調整したと仮定すると、調整の最初のラウンドでは、ダイナミクス (各トラックの音量の大きさ、音量の変化、および重要なトラックを滑らかにする) に対処することができます。たとえば、ある歌手は、ある場所では音楽を圧倒し、別の場所では聞こえない音量範囲を持っている場合があります。ダイナミクス プロセッサは、ダイナミクスをカット、ブーストし、一般的に調整して、重要なコンテンツを聞くことができるようにします。 Audacity で、[効果] をクリックしてこれらの効果にアクセスします。 をクリックし、ドロップダウン リストから目的の効果を選択します。ダイナミクス効果には以下が含まれます:
- コンプレッサー -- この効果は、トラック内のラウドネスの割合を変更するものと考えることができます。たとえば、最も大きな部分が静かな部分の 10 倍になるのではなく、大きな部分が 4 倍だけ大きくなるようにコンプレッサーを調整することができます。これにより、両方の静かな部分が大きくなり、たとえばボーカルがミックスではっきりと聞こえるようになります。 <強い>
- リミッター -- リミッターは、スレッショルドより上の信号を遮断または制限しながら、スレッショルドより下の静かな信号を影響を受けないようにします。音楽コンテンツの時折のピークを制御するのに役立ちますが、アグレッシブな制限は歪みを引き起こす可能性があります。
- レベラー -- コンプレッションとリミッティングの機能を組み合わせたシンプルな複合エフェクトで、特殊効果としても使用できます。
イコライゼーション
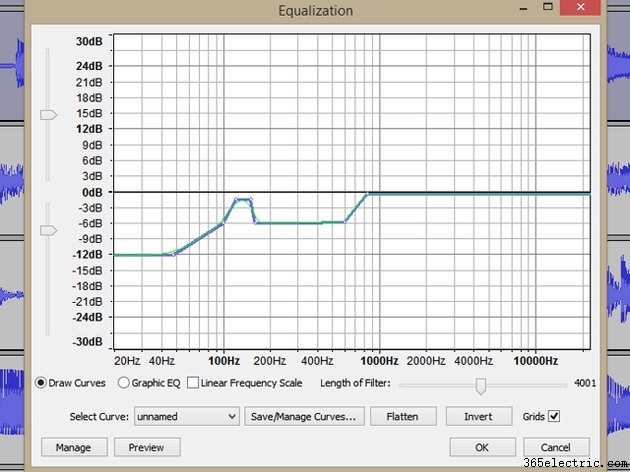
低域から高域までの周波数スペクトル全体でサウンドのバランスをとることは、ミックスを成功させる上で重要な部分です。 In particular, midrange frequencies tend to build up, as many voices and instruments have content in this range, and without adjustment, a mix can take on a "cardboard box" sound when tracks are added. Look to Audacity's EQ effects to remove frequencies from each track that are covered by other instruments and not needed in the final mix.
- Equalization -- Audacity's workhorse EQ, this effect can be using as a graphic equalizer using sliders, or you can click and drag on the EQ graph itself. This effect works across the audio spectrum.
- High-Pass Filter -- A special equalizer that allows frequencies above an adjustable threshold to pass, while reducing those below. A singing voice usually has little content below 150 Hertz, for example, so it's common to set the High-Pass filter to remove audio below this point.
- Low-Pass Filter -- This effect works the same as the High-Pass filter, but instead allows low frequencies through.
- Notch Filter -- This is a narrow band EQ used to treat frequency-specific issues. Examples include nasal vocal sounds or electrical hum from guitar amps.
Reverb
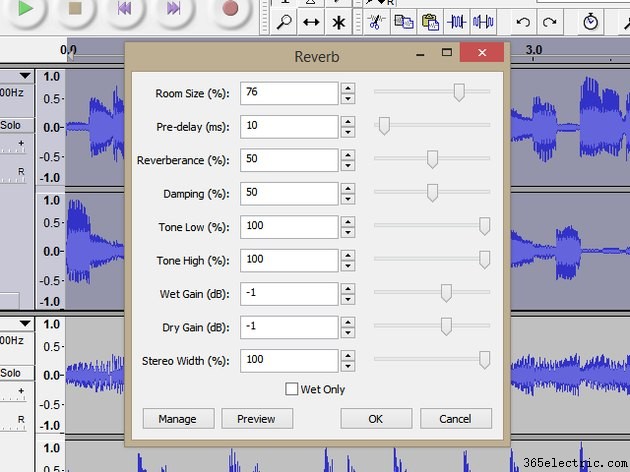
The sound of a great concert hall comes from the way sounds bounce around within it, imparting a sense of space. That's usually called reverb, a series of echoes packed closely together. Reverb effects give a sense of space to both individual tracks and complete mixes. Audacity includes several time-based effects that can give your mix a feeling of depth.
- Reverb -- This effect produces room sound. Its parameters include settings such as room size and reverberance, or approximating the sound of such a room as it would behave in a real setting.
- Echo -- A simple repeat function that probably has only special effects value for mixing.
- Delay -- This effect produces echoes, but with more control. Delays are used where applying reverb may interfere with clarity. Delay gives a sense of depth without the continuous sound of reverb.
Panning
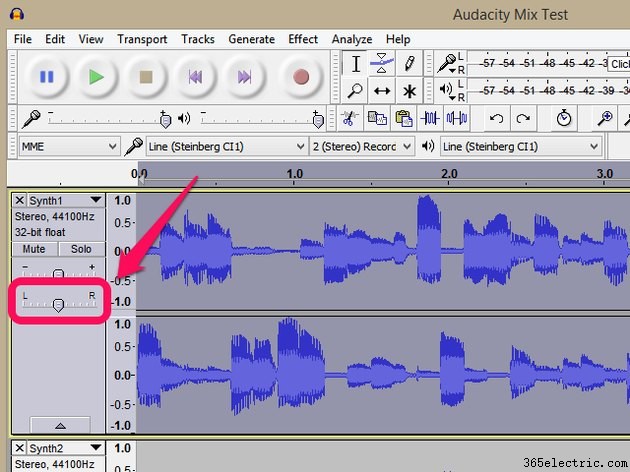
Panning takes place on each track within your Audacity mix project. By default, Audacity creates a stereo mix, which means any sound can be moved between extreme left and right, using this slider. Low frequency sounds, such as electric basses and bass drums, are usually center-panned, since low frequency information isn't very directional anyway, and lead vocals are often panned to the middle too, for prominence and clarity. You can "make room" for vocals by moving instruments with lots of middle frequencies to the left or right. It's common to place instruments from side-to-side as you would expect on a stage, but as with everything in mixing, there are no rules.
Exporting and Rendering
Once your tracks sound the way you want, you have two ways to create a copy of your mix.
- Audacity combines tracks automatically upon export. Simply click File, Export Audio , and then choose the file name, location and file format from the Save as type drop-down.
- Rendering creates a new, mixed track from your existing tracks, and there are two ways to do this. Both are available from the Tracks メニュー。 Mix and Render creates a new mix track that replaces your original tracks, while Mix and Render to New Track does the same, but preserves your original tracks.
ヒント
- Export Audio and Mix and Render to New Track each preserve your original tracks while creating a new mix. These are better options if you expect to remix or rework your original tracks later. You can no longer change your original tracks using Mix and Render .
- Using Save Project and Save Project As from the File menu retains your tracks in Audacity project format, which is not playable outside the Audacity application.