セキュリティ カメラの OSD メニューの説明
HD-TVI、HD-CVI、AHD などの多くの 4 in 1 HD アナログ カメラには、トグル スイッチが装備されています。このトグル スイッチは、OSD メニューにアクセスしたり、カメラのさまざまなモードを手動で制御および切り替えたりするために使用されます。
OSD は On Screen Display の略で、基本的にカメラの内部設定で構成されています。これらのタイプのカメラには、信号タイプ間の切り替えなど、トグル スイッチの基本的な使用法を強調した説明書セットが付属しています。このガイドでは、トグルの使用方法を示し、メニュー エントリとさまざまなオプションについて説明します。
4-in1 カメラでのモードの切り替え
このオールインワン HD アナログ カメラは、トグル スイッチを使用して、接続されているデバイスに応じて、HD-TVI、HD-CVI、AHD、およびアナログ モード (CVBS) の間で切り替えることができます。
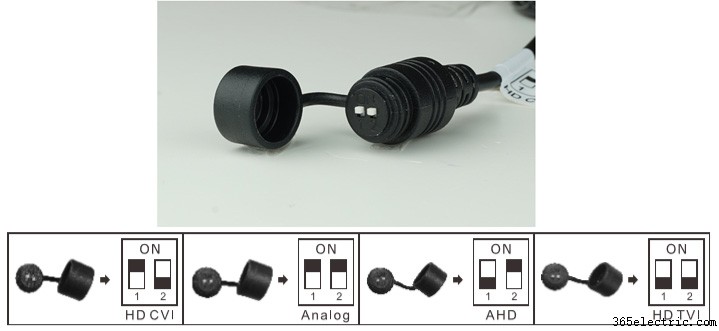
カメラを CVI モードに切り替えるには、メニュー (1) ボタンを押したまま、スイッチを上に動かします (2)。 TVI モードに切り替えるには、メニュー (1) を長押しし、スイッチを左に動かします (3)。 AHD またはアナログに切り替えるには、メニュー (1) ボタンを押したまま、スイッチを右 (4) に動かします。
 お使いの DVR がサポートしている信号の種類を確認してください。たとえば、TVI モードをサポートしている場合は、カメラ信号を切り替えます。 TVI に送信すると、画像が表示されます。
CVI の場合は、カメラを CVI モードに切り替えます。 TVI DVR の CVI カメラなどの信号の不一致がある場合、画像は白黒になり、画面上に巨大な線が表示されます。そのようなものが表示された場合は、カメラを適切なモードに切り替えてください。
他のタイプのカメラには、同じロジックで動作する以下に示すような別の種類のトグルがある場合があります。ラベルに従ってピンを配置するだけで、カメラを HD-CVI、HD-TVI、AHD、またはアナログに設定できます
HD アナログ カメラの OSD メニュー機能
OSD stands for On-Screen Display which is an easy way to access the camera’s internal settings. To access the OSD menu for your camera, press the menu (1) button and hold for 3 seconds. The OSD menu will appear:
 Below is a brief description of each feature located in the OSD menu:
- Lens: Sets the levels and mode of the lens such as deblur and normal.
- Exposure: Sets how light or dark the image will appear. Try a few options until you’re satisfied with the picture.
- White Bal: Regulates preset color temperatures for the camera.
- Backlight: Sets backlight settings for the camera.
- DNR: Sets the noise reduction settings for the camera.
- Day &Night: Sets preset day and night delays for the camera.
- Image: Sets sharpness, color gain, and display output settings for the camera.
- Special: Controls system settings related to display output, color space CVBS, etc. Sets privacy settings, motion detection, shading, color bards, and lens adjustments.
- Return: Allows the user to exit the OSD menu or return to previous screens.
Use the toggle switch to navigate the OSD menu. The up and down directions toggle the on-screen arrow up and down.
To select a menu, press the center menu button. To select or adjust an option in the menu, use the left and right directions on the toggle switch.