ホーム シアターの天井を防音する方法 – ステップ バイ ステップ ガイド
ホームシアターの防音に関しては、何らかの理由で天井が見過ごされがちです。ただし、特にホームシアターが階下にある場合は、特に注目すべき領域です。上の部屋にいる人を邪魔したくありません。この記事では、ホーム シアターの天井を防音する方法について説明します。
3 つのオプションがあります:
<オール>それぞれのステップバイステップガイドに入る前に…
音響パネルと音響タイル
ホーム シアターの天井にシンプルかつ効果的な防音処理を検討する場合、通常、最初に検討するのは音響パネルまたは音響タイルです。
ただし、音響パネル、音響パネル、および音響タイルは、ホーム シアター ルームのエコーを低減および制御するためのものであり、音を遮断するためのものではないことに注意してください。
これは、ホーム シアターの上の部屋に音が届かないようにするために、あまり効果がないことを意味します。
吸音パネルまたは吸音タイルのいずれかが防音に役立ちますが、考慮すべき要素がたくさんあります。
どちらもシンプルで安価で効果的な素材であり、最適な音響ソリューションを実現するのに役立ちます:
1.音響パネル
音響吸音パネルは、吸音材で作られたシンプルなパネルです。
部屋の反響や残響から生じる不要な音を吸収するのに非常に優れています。
これにより、はるかに優れたオーディオ体験が生まれます。 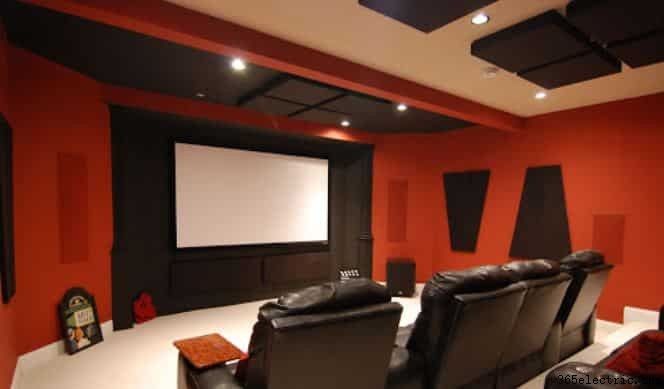
ほとんどの人が音響パネルについて考えるとき、最も多くの音を反射する場所の壁に配置される壁の音響パネルについて考えます。
吸音パネルを使用することは、天井を防音する最も簡単な方法です。安価で非侵襲的であるため、実際に行うのにほとんどスキルは必要ありません。
ただし、不要な音を完全に吸音するためには、天井に吸音パネルを配置することも重要です。実際、特別に設計された音響天井パネルが市場に出回っています.
最後に、美学がすべてである場合は、既存の装飾と素晴らしくシームレスに見えるプロ仕様の音響天井パネルを入手してください。
実際、ハイエンドのものの多くは、ファブリックやその他のクールな仕上げで、インテリア デザイン スタイルの全体的な美しさを増すことさえできます.
2.音響タイル
音響タイルは音響パネルに似ており、さまざまなサイズとテクスチャで作られたタイルのカットです。
唯一の違いは、音響タイルは設置が少し難しいことです。これらのタイルは、柔らかく、通常は繊維質の吸音材でできています。
このような素材には、多くの場合、グラスファイバー、木材、コルクが含まれます。
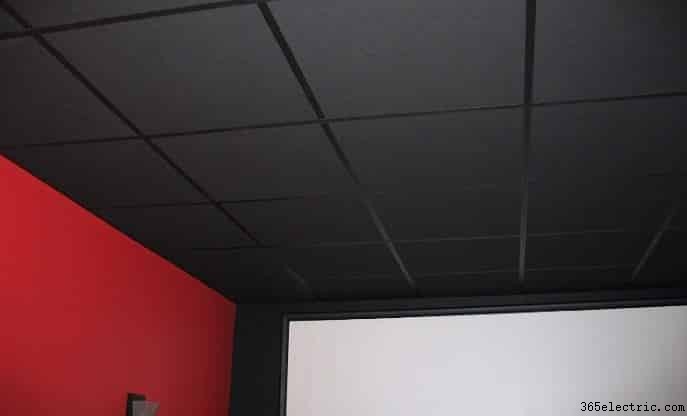
通常、タイルを取り付けるようなパターンで取り付けるため、取り付けが少し難しくなります。
たとえば、八角形の音響タイルを作成することにした場合、特に不規則な空間では、すべてを修正するのに時間がかかります。このようなデザインの音響パネルもありますが、通常の正方形や長方形がより一般的です。
音響タイルは、ユニークな装飾を作成したり、現在の装飾にシームレスにフィットしたりするのにも優れています.吸音パネルは親指のように突き出てしまうことがありますが、吸音タイルは気づかれずにきれいに設置できます。
吸音タイルを所定の位置に保持するために乾式壁とパネルの背面にねじ込む専用のクリップを使用するだけなので、通常は乾式壁の天井に設置されます。
さらに簡単な取り付けプロセスは、各パネルの背面に建設用接着剤を塗布し、天井に貼り付けるだけです。
ただし、音響タイルは少し重くなる傾向があるため、これは常に推奨されるわけではありません。タイルを固定するために接着剤を使用する場合でも、タイルをしっかりと固定するためにネジまたは釘を使用することもお勧めします.
音響パネルと音響タイルの比較表
| 音響パネル | 音響タイル |
| さまざまなデザインと素材をご用意しています。これには、基本/標準、デザイナー、漂白剤で洗える、カスタムのファブリック ラッピングの選択肢が含まれます | いくつかのデザインと素材をご用意しています。これには、基本/標準、デザイナー、漂白剤で洗える、カスタムのファブリック ラッピングの選択肢が含まれます |
| 通常は 2 インチと 4 インチの厚さで利用可能 | 通常、0.5 インチ、1 インチ、1.5 インチの厚さで利用可能 |
| インストールが非常に簡単 | インストールが少し難しい |
| 額縁を掛けるように壁に掛けられます。たとえば、Z クリップを使用できます | 粘着テープまたは工業用接着剤を使用して壁に取り付け |
ホームシアターの天井を段階的に防音
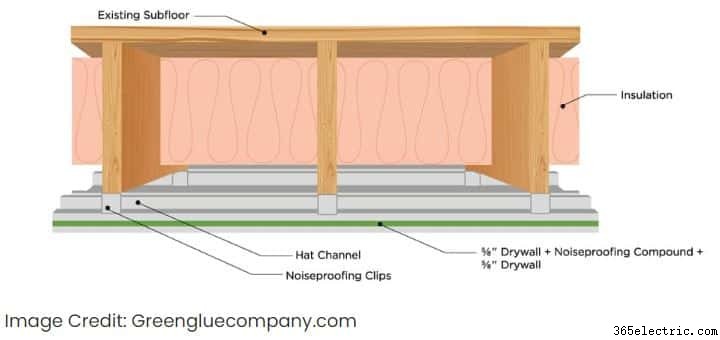
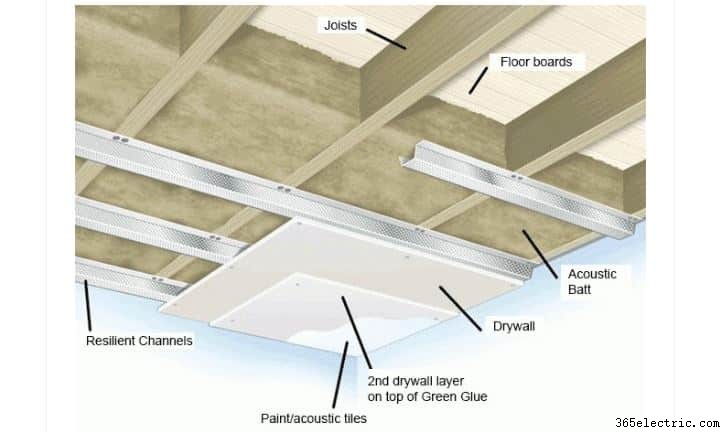
オプション 1:天井根太を分離し、分離された乾式壁を追加する
天井を完全に防音するために、次の手順を実行します:
<オール>天井を吊るしたり浮かせたりすることもできます。これについても説明します。
この分離と分離のプロセスにより、分離された天井が作成されます。これを行うには、現在の天井の上に新しい天井を構築します。
この天井は元の天井の接合部に取り付けられますが、数インチ吊り下げられています。また、古いチリングを取り除き、根太を追加してから、分離乾式壁を追加することもできます.
これを段階的に行う方法を見てみましょう:
1.根太を分離する
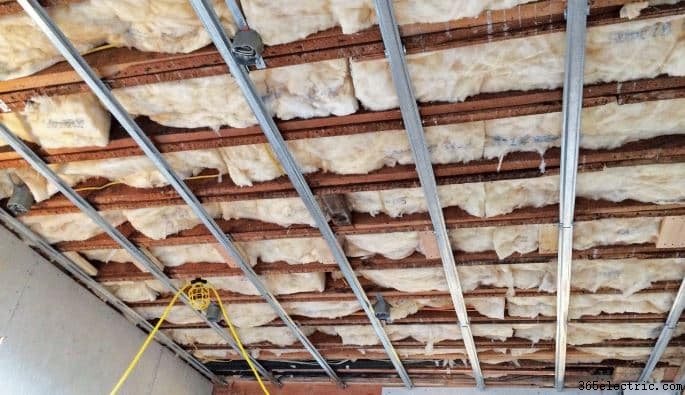
ほとんどの天井は、シートロック/乾式壁、合板、ボードまたは木製パネル、および天井根太に直接接続するその他の材料で構築されています.
これの問題は、この表面に当たるすべての音が天井の根太を通して上の部屋に伝わることです.
ホーム シアターから上の部屋に伝わる音を減らす優れた方法は、天井の接合部を分離することです。
これは、ジョイストと天井面の間の直接接続を取り除くことを意味します。
天井根太は、天井を横切る水平垂木です。それらは、屋根からスタッドに荷重を伝達するために、天井を組み立てたり、梁の間を走ったりするのに使用されます.
この例では、既存のジョイストを維持します。既存のジョイストと 2 インチ下の間に新しいジョイストを取り付けます。そのため、天井の高さが若干低くなる可能性があることに注意してください。
天井根太を分離する方法を見てみましょう:
<オール>
2.断熱材を追加
ほとんどの天井には、特に北米、ヨーロッパ、北アジア、または寒冷な気候を経験する国に住んでいる場合は、すでに何らかの形の断熱材が付いています.
ただし、ホーム シアターの天井が既に断熱されている場合でも、断熱材はおそらく遮音を考慮していないため、音波が伝わりやすいでしょう。
このため、適切な遮音を追加する必要があります。
根太と追加する乾式壁の間の空間を断熱することは、音の振動が通過するのを減衰させ、防ぐのに役立つ非常に良い考えです.
グラスファイバー断熱材は、空気伝搬ノイズを低減し、加熱または冷却された空気の損失を減らすことができるため、優れた選択肢です。つまり、光熱費も安くなります!
ただし、ファイバーグラスの天井にのみファイバーグラスの断熱材を取り付けることが非常に重要です。天井が下がっている場合は、ファイバーグラスを使用しないでください。このような天井には、ダクト、照明器具、電線、その他の要素があることを忘れないでください。
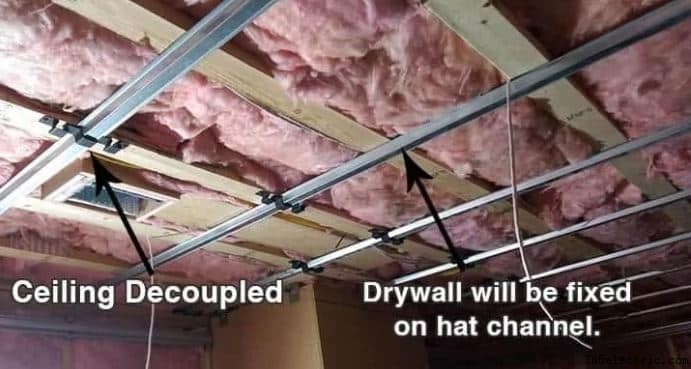
3.デカップリング マウントを取り付ける
次に、乾式壁を根太から分離できるように、デカップリング マウントを追加する必要があります。 Meaning, you won’t be connecting the drywall directly to the joists.
Instead, you will be installing the decoupling mounts on the joists and then mounting the drywall to the decoupling mounts.
In this case, you don’t even need to use decoupling mounts. You could simply attach the resilient channels to the original ceilings and use sound-isolating clips or whisper clips to attach the resilient channels.
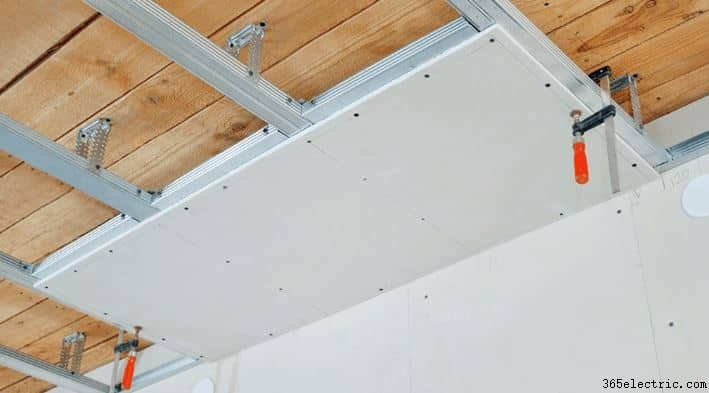
4. Adding Decoupled Drywall
Once you have isolated the joists, you would have prevented sound vibrations from transferring from the joints to the room above.
However, to fully isolate the sound, you will need mass. Acoustic drywall is an excellent source of the mass because it’s thick and heavy.
You should not use regular drywall for this purpose. You should purchase acoustic engineered drywall from your local hardware or home department store. Additionally, 5/8″ drywall is a good choice since it’s heavy.
This type of drywall is specifically designed for acoustic treatment and is thicker than standard drywall.
Here is how you should go about installing your decoupled drywall:
<オール>注: If you can’t afford two to three layers of drywall, you should also consider using a base layer of say plywood or OSB and then add your layer of drywall to finish.
What If I Don’t Want To Ter Down My Ceiling?
If removing your old ceiling is too difficult for you, a simple solution is to add acoustic caulk between the old ceiling and the new acoustic ceiling.
By doing so, you won’t need to tear down your old ceiling and you would still achieve some level of sound isolation with the acoustic caulk.
Another method is to suspend the new ceiling from the original ceiling. If you want to do this, read on.
Option 2:Drop/Float/Suspend The Ceiling
Drop/Float/Suspend The Ceiling
Another method to go about this, as we mentioned before is to completely suspend the new ceiling from the original ceiling.
This is a great choice especially if you do not want to remove the old ceilings or if your home theater room has enough height to accommodate a suspended ceiling.
How does this work? Well, this system offers soundproofing in two ways:
<オール>One drawback here is if the ceiling has a lot of fixtures such as lighting, fans, etc. In this case, the electrical work and other fittings may be difficult to work with unless you are a professional.
Here’s how you can go about suspending your ceiling:
<オール>How Far Apart Should I Place The Acoustic Panels?
The perimeter occurs if all the four panels are positioned so that their long sides are touching, with only 48 inches of the perimeter. Spread them evenly at a 4-inch in between the panels, with the perimeter of the entire panels increasing to 72 inches, while the efficiency of the layout goes up by 50%.
When placing panels, the following do’s and don’ts should be observed.
Don’ts
- Leave two parallel walls untreated
- Put all panels directly together in the same area, reducing the P/A ratio
- Place the panels too high above for sound will take longer to reach them
- Place the acoustic panels too close to the ground. Where bumping is possible, or get dirty and dinted
Do’s
- Symmetrically position the panels, applying the wall length, and any sub-patterns should dictate the best spacing
- Spread the acoustic panels for efficient acoustic treatment
- Use impact-resistant acoustic panels if in a gym or either lively setting where there is a likelihood of testing them.
結論
There are many ways you can go about soundproofing the ceiling of your home theater. We explored the three most prevalent in this article. Take some time to decide which option is best for you and keep in mind that acoustic panels and tiles are for echoes and not blocking sound.
Also, note that you can indirectly soundproof the home theater ceiling by soundproofing the floor in the room above. Simple ways to go about this is to use Mass load vinyl or thick rugs.
Finally, since you are considering soundproofing your home theater ceiling, we suggest that you check out all the other methods to soundproof your home theater.
Good luck!