チャート付きカー オーディオ ワイヤー ゲージ ガイド
チャート付きカーオーディオワイヤーゲージガイド
カー ステレオ システムをアップグレードするときは、適切なサイズのワイヤー ゲージを取得することが重要です。さまざまな要因が関係しますが、このワイヤー ゲージ ガイドは、どのサイズを取得するかを理解するのに十分な知識を提供します。
アンプ、サブウーファー、スピーカー、その他のコンポーネントのいずれであっても、新しい機器を最大限に活用するには、適切なサイズのワイヤを入手することが重要です。
間違えると音楽のサウンドに影響を与えるだけでなく、オーディオ機器や車の電気配線が損傷し、最悪の場合、車内で火災が発生する可能性さえあります。
この記事では、カーオーディオ配線の主な種類と、それぞれに必要なさまざまなサイズのワイヤ ゲージについて説明します。各説明にはワイヤ ゲージ チャートがあり、必要なゲージを十分に把握できます。
アメリカン ワイヤー ゲージ (AWG)
世界のほとんどの国では、電気導体の直径に関する米国の標準測定値である American Wire Gauge (AWG) が使用されています。これは、銅を必要なサイズに引き下げるために最初に必要だったダイの数に基づいています。したがって、数字が小さいほど、ワイヤー ゲージは太くなります。
AWG は、さまざまなメーカーが使用するさまざまな測定値を置き換えるための標準として、1857 年に初めて導入されました。最大のワイヤ ゲージ サイズは 0000 AWG ですが、最小の標準サイズは 40 AWG です。
これは、単線と撚り線の両方に使用されますが、撚り線の銅線は、同じゲージであっても単線よりもわずかにかさばることがあります。それでも、AWG ワイヤ ゲージ ガイドを使用すると、同じ結果が得られます。
ストランド数を増やすとオーディオ パフォーマンスが向上するかどうかについては多くの議論がありますが、実際にはワイヤーのストランド数が多いということではなく、適切なワイヤー ゲージを取得するということです。
ワイヤー接続が適切に固定されていることを確認してください
適切なサイズを得るにはワイヤー ゲージ ガイドを使用する必要がありますが、オーディオ機器を取り付ける際には、ワイヤーをしっかりと接続することも重要です。
接続が悪いとすぐに外れてしまう可能性があり、そうなった場合、ステレオ システムに多くの問題が発生し、不要な頭痛が発生する可能性があります。
コネクタにはさまざまな種類があり、特定の電気配線に適したものもありますが、どのコネクタを使用する場合でも、確実に接続されていることを確認してください。
圧着コネクタで十分です。基本的に、それらはより線を終端または接続するために使用される電気コネクタです。ワイヤはコネクタに入り、クリンパで圧着する限り、永続的でしっかりとしたグリップが得られます.
はんだ付けも、電気配線を固定するための優れた方法です。もう少し手間がかかりますが、適切なはんだ付け機器を使用して正しく行われている限り、ワイヤとオーディオ機器を接続する最も安全な方法です.
ワイヤをはんだ付けすると最適な接続が得られますが、作業を正しく行うようにしてください。これまでに行ったことがない場合は、圧着コネクタを入手することをお勧めします。はんだ付けが不十分な接続は多くの問題を引き起こす可能性があるためです。
ワイヤを接続したら、接続をシュリンク ラップすることをお勧めします。これにより、ほこりや汚れからそれらを保護し、接続を強化して、ワイヤが引き離されないようにします.
これで、AWG 規格に関するすべての情報が得られ、電気配線に最適な接続が得られました。次は、各取り付けのワイヤ ゲージ ガイドを確認します。
接地接続
車に取り付けられているすべての電気機器には、接地接続が必要です。アースは、ユニットに電力を供給する負の電気接続であり、主に車のシャーシに接続されます。カーオーディオの問題の最も一般的な原因は、おそらく接地不良です。これを正しく行うようにしてください。
アース線は、シャーシの塗装されていないきれいな金属または専用のアース ポイントにしっかりと取り付ける必要があります。アースを接続するのに最適な場所は、シートベルト ボルトの下です。これにより、シャーシに確実に接続できます。
アース線は、アプリケーションに必要な適切なサイズのワイヤ ゲージである必要があります。そのため、600W のアンプを設置する場合は、アース ワイヤ ゲージがそれに電力を供給できる必要があります。
一般に、接地線は電源ケーブルと同じサイズになりますが、これについてはすぐ下で説明します。そのため、接地用の適切なワイヤ ゲージ ガイドについては、電源ケーブルのサイズに従ってください。
車内でのアンプの配線
お使いのアンプは、オーディオ機器の中で最もエネルギーを消費する部品ではないにしても、その 1 つです。アンプがプッシュできる RMS が大きければ大きいほど、より大きな電源ケーブルが必要になります。
電源線が小さすぎると、アンプがすぐに損傷する可能性があるため、これを正しく行うようにしてください。
To work out the wire gauge needed for your power cable you need an idea of how much current your amp will try to consume, and on how long the wiring run from battery to amplifier will be.
To work out the approximate amperes of your amplifier, you need to multiply the number of channels by the RMS per channel. If you have more than one amp, you need to add them all together, and divide that by the efficiency and then the voltage.
There are two common types of amplifiers:D Class and A/B Class. You never get 100% efficiency out your amp, so it throws another spanner in the works. Generally, Class D amps are more efficient and you should get around 75% efficiency, whereas with an A/B amp you will get around 50% efficiency.
So, to work it out:If you have a Class D amplifier, you need the total RMS divided by 0.75 Amp Efficiency divided by 13.8 Volts to get your Current Draw in Amperes.
So, if you have a 600W RMS Class D amp, your math will be 600/0.75/13.8 =57.9710145, which rounded up is 58 amperes.
As you can see in the wire gauge chart below, the gauge needed for an 8 foot power cable would be 8 gauge.
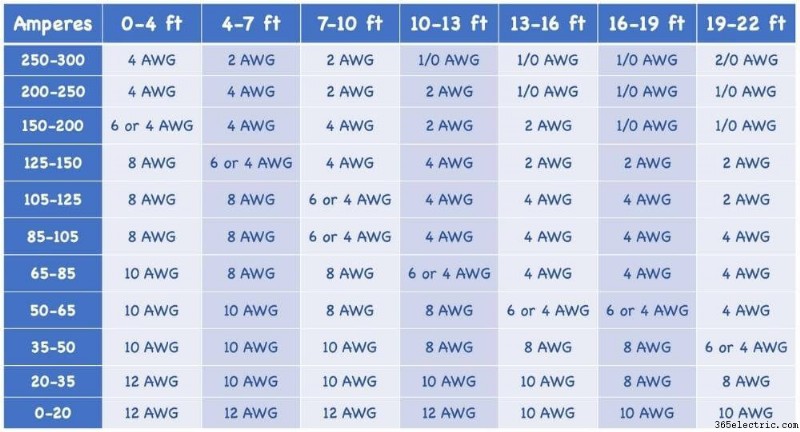
If you have an A/B Class, you need the total RMS divided by 0.50 Amp Efficiency divided by 13.8 Volts to get your Current Draw in Amperes.
So, if you have a 600W amp, your math will be:600/0.5/13.8 =86.956521, which I’d round up to 87 amperes.
As you can see in the wire gauge guide above, the AWG I’d need for a power cable of the same length would be either 6- or 4 gauge wire. I would always round down and go for the bigger wire so I’d get a 4 gauge power cable. Quite a difference from the D Class amp above!
Other Wires Running From Amplifier to Receiver
You can get amp wiring kits with all the wires and connectors in, which are a good idea as you can keep hold of them in case you need to replace any wires further down the line.
All amplifiers will come with a Remote Turn-on Wire, but if you have to replace it, you should get an 18 AWG blue wire.
For the RCA Jacks, you will just need to replace them with some standard RCA male-to-male jacks. These usually come between 22 gauge to 18 gauge, and the more powerful your amplifier is, the better it is to go with the bigger 18 gauge
Speaker Wires
Running speaker wires, whether it’s directly from your head unit or from your amplifier, allows your speakers to receive the audio signal, so they can reproduce those amazing sounds we all love to drive along to.
Speaker wires are typically 2 separate stranded wires molded together, with one strand being the positive + and the other strand being the negative – strand.
There are many different qualities of speaker wire, so it’s a necessity that you get the best you can afford, because cheaping out on speaker wires, will cause you problems and you won’t get the best out of your audio equipment.
Some cheaper wires that claim to be a certain gauge might not be, and instead you’ll be buying more plastic sleeve than wire.
Depending on the speakers you have will determine the wire gauge you need, and below in the wire gauge chart you can work out what is best for you.
Factory speakers will run on pretty much any size wire, as the power demands are minimal. But of course, most people into audio upgrade their car speakers, so getting the right size wire is necessary for you speakers and subwoofers.
Aftermarket speakers need more power, so the electrical wiring that drives the signal to them needs to be bigger than factory speakers.
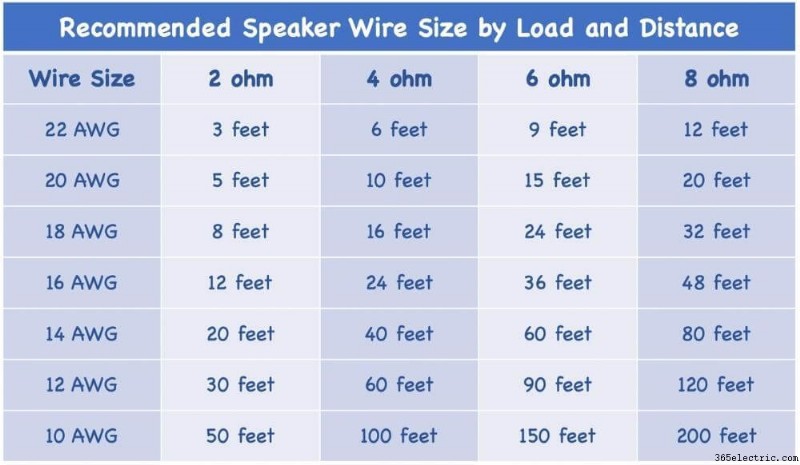
Speaker wires are usually between 18-14 gauge, but to work out the size for yours, you should know the Impedance and distance.
Looking at the chart above:If you are running speakers at 4 ohms and the distance needed is 20 feet, then you are between 18 and 16 AWG. In this case I would always go for the bigger wire, so go for 16 gauge.
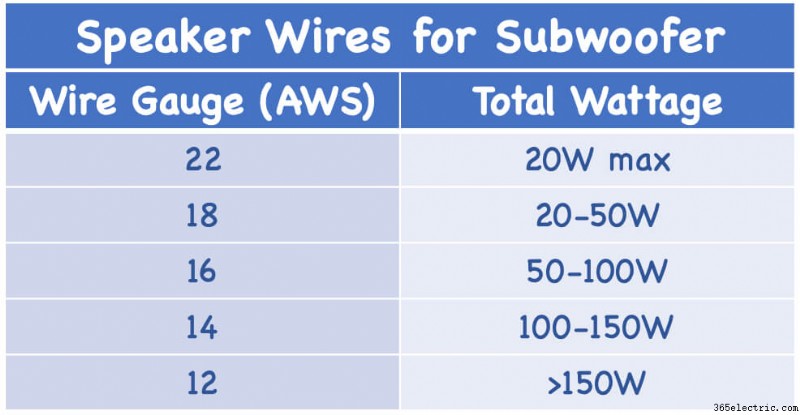
For subwoofers the speaker wire will tend to be a bit bigger. Usually you will need as big as 14-12 AWG, but the calculations are the same as the speaker wires on the wire gauge chart above.
Although another general rule of thumb is to work out its total wattage, and looking at the wire gauge chart here with RMS wattage, you can just go for that size wire.
You can use both wire gauge guides to come up with the wire size you need, but generally speaking you should need something between 16- and 12 gauge speaker wire for your subwoofer. And always go for the bigger wire if you’re getting mixed results.
Crossover Wiring
Using a crossover gives you more control over your sound system, but many people get confused with the electrical wiring.
Crossovers need 12v of power, which many people think it needs a thicker gauge wire, but because crossover demands less current, as a general guide 18 gauge wire is usually fine.
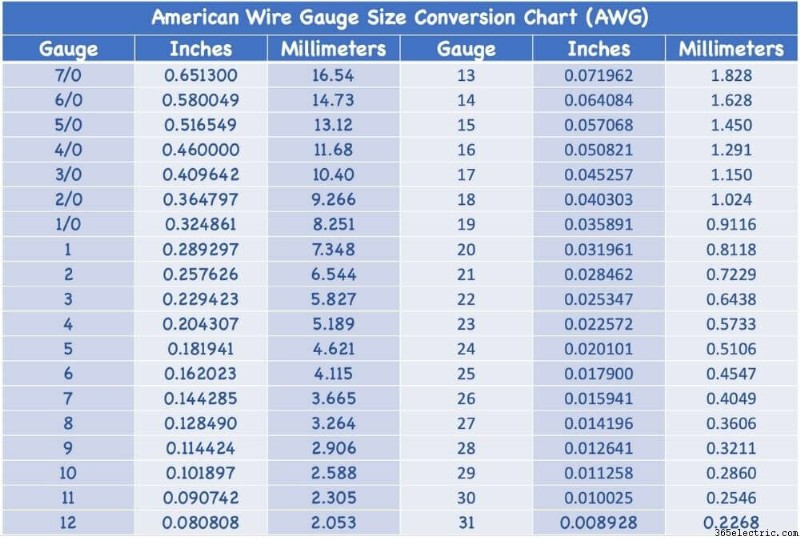
Wire Conversion Chart
All measurements in the wire gauge charts above are imperial, but for anyone who works in metric (most of the world), please find the wire gauge chart below for converting inches to millimeters useful.
Other FAQs About Electrical Wiring Gauge
Why do you need different gauge for different wire lengths?
Basically, resistance increases the longer electrical current has to travel. This is because as it’s travelling the electrical resistance builds up, so the longer it is, the more resistance. And the electrical current can only travel so far before there’s a voltage drop, which is why you need a bigger power cable.
What happens if I go too small?
If you get too small a size wire, it depends, but it’s not good. You might be lucky and just temporarily lessen the quality of of your soundstage, or you could damage your equipment and even set your car on fire.
The problem is determined by the wrong wires you install. That’s why it’s always necessary to know the correct size you need by looking at wire gauge guides.
What happens if If I go too big?
If you go too big, don’t worry too much as it won’t damage anything. But of course if you go too big it will cost you unnecessary outlay as the bigger wires are more expensive.
Also, the bigger the wire, the more room it will take up and the harder it is to bend. So, try and get it right, but too big is definitely better than too small.
What happens if my wires are too long?
When you buy the wires, it’s always a good idea to buy more than enough. However, when you install your audio equipment, don’t leave too much wire hanging out or even rolled behind something, even if it’s hidden.
Cut the wire at the appropriate length, because longer wires add unnecessary resistance and can create impedance. It also leaves your car looking messy.
Choosing The Right Size Wire for The Right Audio Equipment
So there you have it, a wire gauge guide for all the important electrical wiring in your car stereo system.
All the different wire sizes can be confusing, but looking at the charts or even a wire gauge calculator will give you a better understanding of which size to get.
All wiring is important, but pay particular attention to your power leads and do the math correctly for the total amperage and distance, because this is where you could get most problems.
Always ensure you buy good quality wiring, because you don’t want more sleeve than wire. There are some great amp wiring kits out there with all wires needed, so if you need the full bundle one of these is a good way to go.
Last but not least, always make sure you connect all wires with a good solid connection. Whether it’s crimp connectors or soldered connections, it’s up to you, but whichever way, make sure you test the connection with a few good tugs as you wire everything up.
If you have any questions and need more wire gauge guidance, leave a message in the chatbox below and we will get back to you.