カー オーディオ + ダイアグラムなどの EQ とクロスオーバーの配線方法!
カーオーディオシステムの優れたサウンドは、使用している機器と方法に大きく依存します あなたはそれを使っています。イコライザーとクロスオーバーは、システムに対して行うことができる最も有益な投資の一部です。
この記事では、カー オーディオ システムの EQ とクロスオーバーを配線する方法を説明します。 内部には、役立つ図、知っておくべき基本事項、その他の非常に役立つ情報が含まれています!
最初に EQ またはクロスオーバーを行うのはどれですか?イコライザーとクロスオーバーの違い
イコライザーとクロスオーバーの両方を使用する場合、イコライザーはクロスオーバーの前に接続されます。 これにはいくつかの理由があります。その 1 つは、イコライザーの役割とクロスオーバーの役割です。
イコライザー (オプションのクロスオーバー機能を含む場合でも) は、コンテンツを調整します クロスオーバーは、1 つまたは複数のアンプに向けられたオーディオ信号の部分を分離するために使用されます。
- イコライザーを使用して、音楽の音の周波数を改善し、音声信号自体を調整します。
- クロスオーバーは、使用するスピーカーに基づいて 1 つまたは複数のアンプに送信されるサウンドを制御し、2 ウェイまたは 3 ウェイのコンポーネント スピーカー システムなどの設置をセットアップするために使用されます。
カーオーディオのイコライザーは何をしますか?
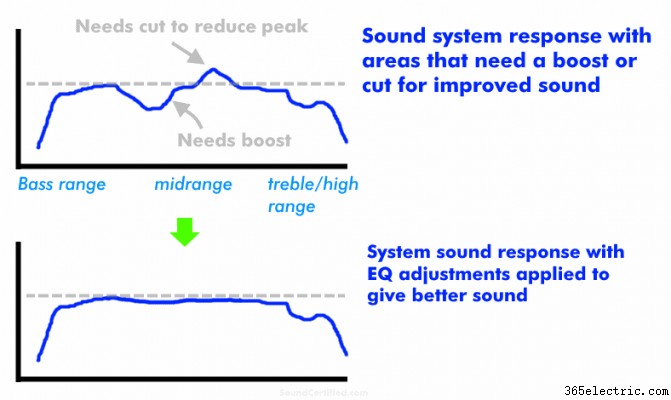
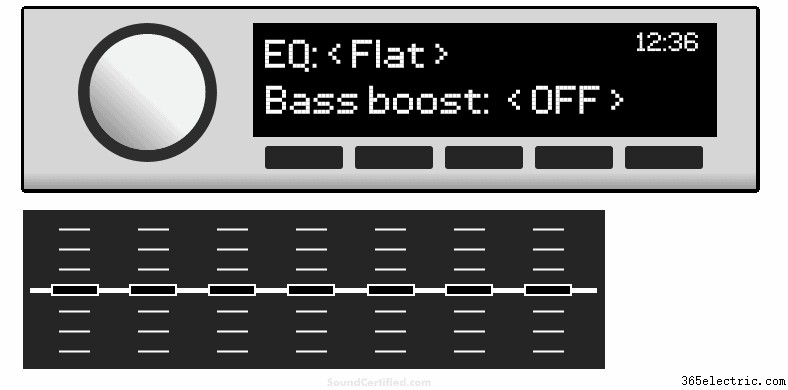
イコライザーの背後にある基本的な考え方を示す図。イコライザーは、オーディオ システムの小さな範囲のサウンドを増減してサウンドを改善するのに役立ちます。たとえば、一部の周波数の「ピーク」(高音量領域) を減らし、他の周波数をブーストすることができます。
イコライザーは、遊び心にあふれたクールなものの単なる派手な名前ではありません。 イコライザーは、音楽の「帯域」または音の周波数範囲を調整することで音質を改善できる電子デバイスです。
これは、サウンド周波数を増減 (「ブースト」または「カット」) するコントロールを提供して、システムとスピーカーによって生成される周波数応答を改善することによって行われます。
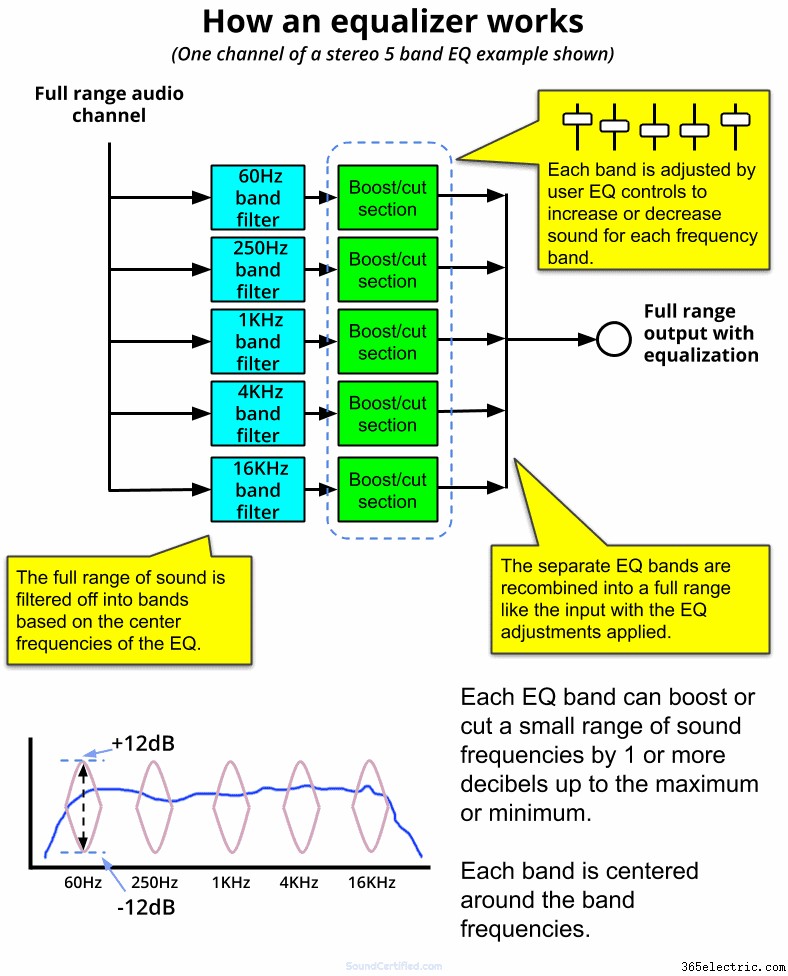
イコライザーには、必要に応じて好みに合わせてサウンドを調整できる多数のコントロール (通常はスライド コントロールまたはロータリー ノブ) があります。例:低音が足りない?低い周波数 (低音) の範囲で 1 つまたは複数のノブを上げることができます。ミッドレンジのようないくつかの領域で音楽がきつすぎますか?スピーカーが生成しすぎるオーディオ周波数の範囲をカット (減少) できます。
クロスオーバーの目的は何ですか?
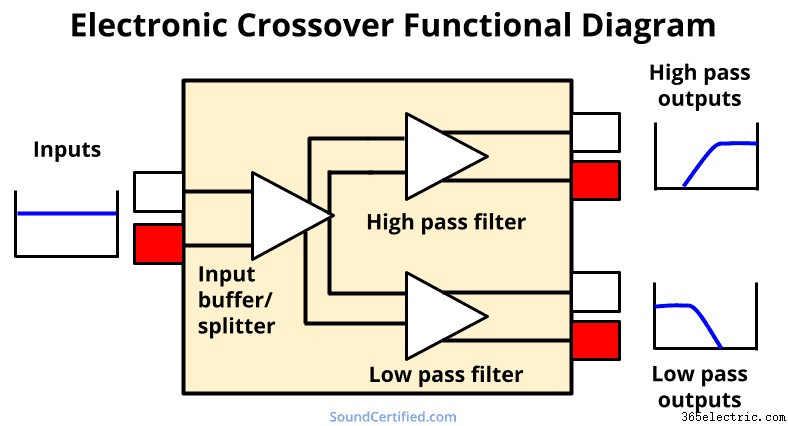
クロスオーバーは、入力されるフルレンジの音楽信号を 1 つまたは複数のハイパス信号またはローパス信号に分離する電子デバイスです。 これにより、特定のスピーカーに向かう不要な音の周波数をブロックして、最高の音を実現し、歪みを防ぎ、より良い音を得ることができます。
例:
- ツイーターは、大きなスピーカーに送られる低音から保護する必要があります。そのため、ツイーターやその他の小型スピーカーとハイパス クロスオーバーを使用しています。
- フルレンジまたはミッドレンジのサウンド レンジを再生すると、ウーファーの音が良くありません。ローパスクロスオーバーを使用することで、非常にクリアなサウンドと「純粋な」低音を実現できます。
最近では、多くのカーアンプに電子クロスオーバーが組み込まれています。ただし、それらを提供していない、または制御の量が限られている 1 つまたは複数のアンプを使用している可能性があります。独立した電子クロスオーバーにより、他の方法よりも多くの制御と調整が可能になります。
より洗練されたカスタム カー オーディオ システムにも使用できます。
クロスオーバーは音質を改善しますか?
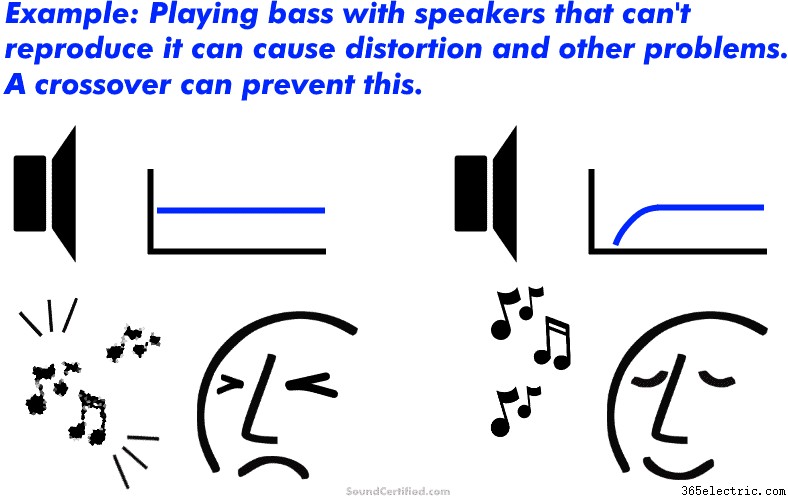
クロスオーバーは音質に役立ちますが、イコライザーほどではありません。 たとえば、6.5 インチのフルレンジ スピーカーなどの小型スピーカーでハイパス クロスオーバーを使用して、歪みの原因となりスピーカーが処理できない非常に低い低音をブロックできます。その結果、処理能力を超えて駆動されたときにスピーカーが持つひどい音のない、より良い音になります。
同様に、ミッドバス スピーカーやサブウーファーへの不要な音をブロックすることで、再生するように設計されていない音による耳障りや歪みのない、素晴らしいサウンドの「純粋な」音域が得られます。
クロスオーバーを使用して適切にセットアップされたスピーカー システムには、多くの効果があります。 無いよりいい音。また、他の方法よりも大きなパワーと音量でスピーカーを駆動することもできます。その結果、より高い出力レベルでも非常に優れた明瞭なサウンドと楽しい音楽が得られます。
イコライザーをカーステレオに接続するにはどうすればよいですか? (図)
カー ステレオをイコライザーに接続するのは、通常は非常に簡単です。ほとんどは多かれ少なかれ同じですが、もちろんモデルごとに多少異なる場合があります。ここで基本を説明し、次の別のセクションでクロスオーバーについて説明します。
1.電源とリモートオンの配線を接続

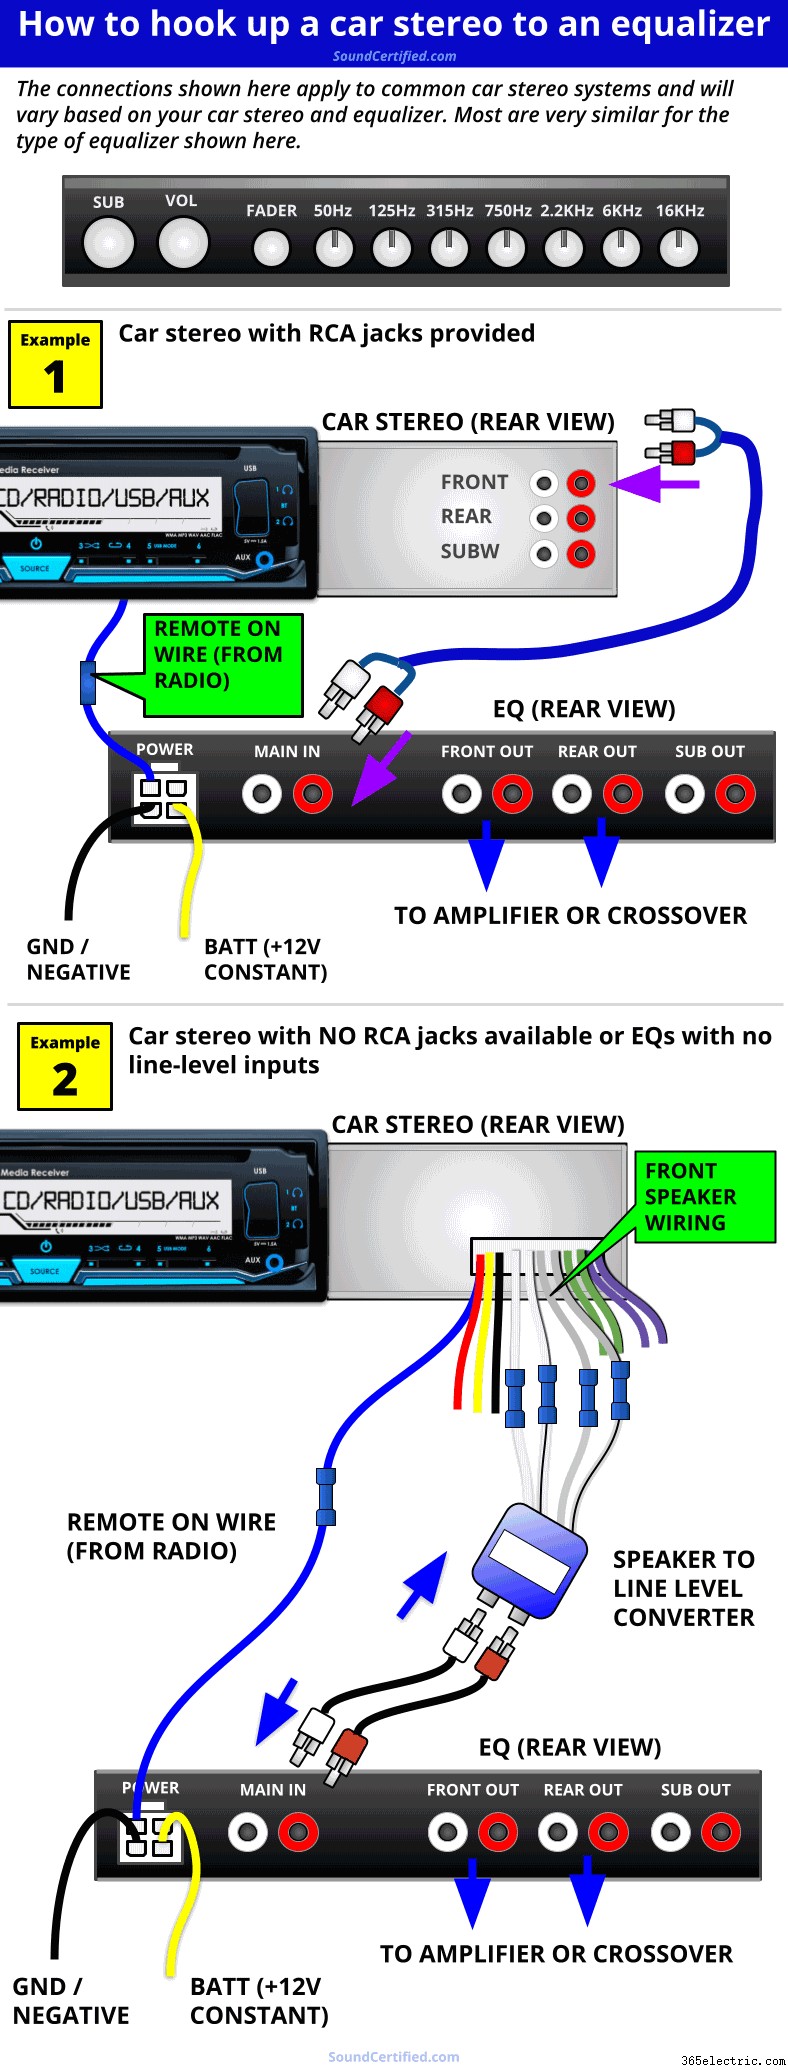
電源配線ハーネスとオプションのスピーカー レベル入力ハーネスを備えた典型的なイコライザーの例。ほとんどの EQ は、+12V 固定 (バッテリー電源)、リモートオン リード、およびアースの 3 つの電源接続を使用します。
通常、イコライザーには、電源とターンオン コントロールのために接続する必要がある非常に単純な配線があります。
- アース線 (マイナス) – 車両のアース (シャーシ) またはラジオのアース接続にも接続します。
- バッテリー電源 – ラジオのメモリ (+12V BATT) 接続または別の常時オンの +12V ソースに接続します。
- リモート オン ワイヤー – これにより、EQ が無線で自動的にオンまたはオフになります。最良の結果を得るには、これをラジオのリモート オン ワイヤーに接続します (多くの場合、別のワイヤーを使用するよりも簡単です)。
- *イルミネーション/調光器 [存在する場合] – これはあまり一般的ではありませんが、一部の EQ にはディマー コントロールがあります。正の照明信号が接続されている場合、EQ ディスプレイまたは照明が暗くなるため、必ず取扱説明書を確認してください。他の人は、マイナス (またはアース) 接続で調光器をアクティブにします。 必要に応じて、このワイヤーは無視できます。調光器/照明制御ワイヤーは必要ありません。
通常、イコライザーは数台のアンプしか使用しないため、ほとんどの場合、たとえばカー アンプのように別の電源接続を使用して配線する必要はありません。さらに、設置によってはオルタネーターの鳴き声 (グラウンド ループ ノイズ) が問題になる可能性があるため、ラジオと同じグラウンド接続を使用することもしばしば良い考えです。
電源配線を接続したら、オーディオ信号の接続を開始します。
2.イコライザー信号入力 RCA を接続します
ほとんどの EQ は、ヘッド ユニットの RCA 出力ジャックに接続する 1 組の RCA 入力を使用します。これは、標準の EQ が左右両方のチャンネルで同時に機能する EQ コントロールの単一セットを使用するためです。多くの場合、フロントからリアへのフェーダー コントロールも含まれているため、多くの場合、カー ステレオからのリア RCA 接続は必要ありません。
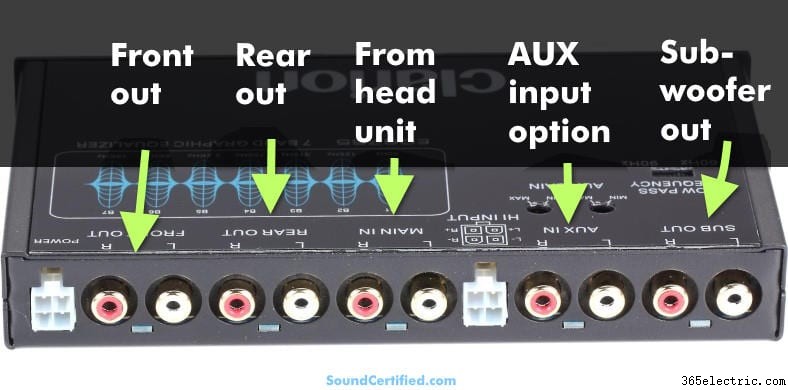
車載イコライザーの RCA ジャックの接続:
<オール>Once you’re connected to the car stereo and the crossover you’re ready to install the crossover too.
Connecting a car stereo with no RCA jacks to an EQ
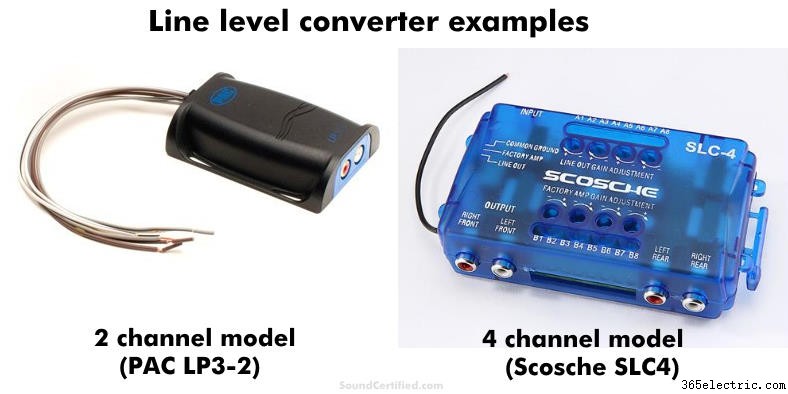
Examples of two good speaker wire line level converters (one for a pair of speaker outputs, one for 4 speaker channels &4 RCA outputs). Line level converters scale down the higher voltage signal from a car stereo to a lower voltage (“line level”) that an EQ, crossover, or amplifier can use without distortion or damage.
The great news is that you can still use an EQ and crossover with a factory or aftermarket car stereo with no RCA jacks. You’ll need a good quality speaker output to line level converter to do this.
Line level converters are designed to allow connecting to an amplifier’s RCA inputs by converting speaker outputs from a stereo (a higher voltage required to drive speakers) to a low-level signal that an EQ, crossover, or car amplifier can use.
It’s very important to buy a quality, well-designed line-level adapter to avoid noise, poor sound quality, and other problems. Don’t get the cheapest – instead, get a name-brand model you can rely on (like the examples you see above). You can get a nice one like these for around $15-$20 or less these days.
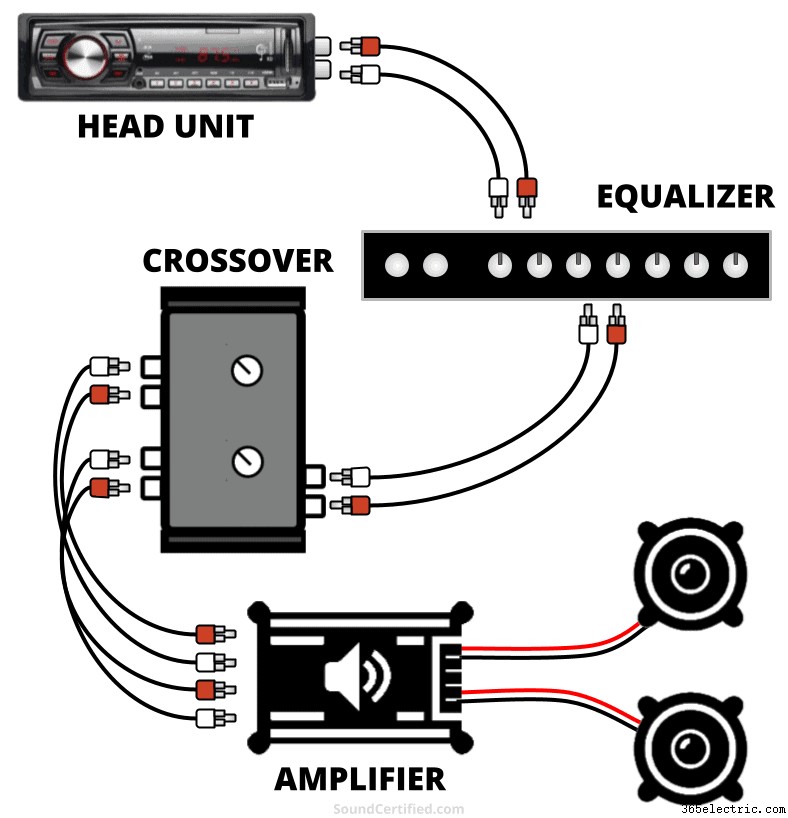
How to wire an EQ and crossover for car audio (DIAGRAM)
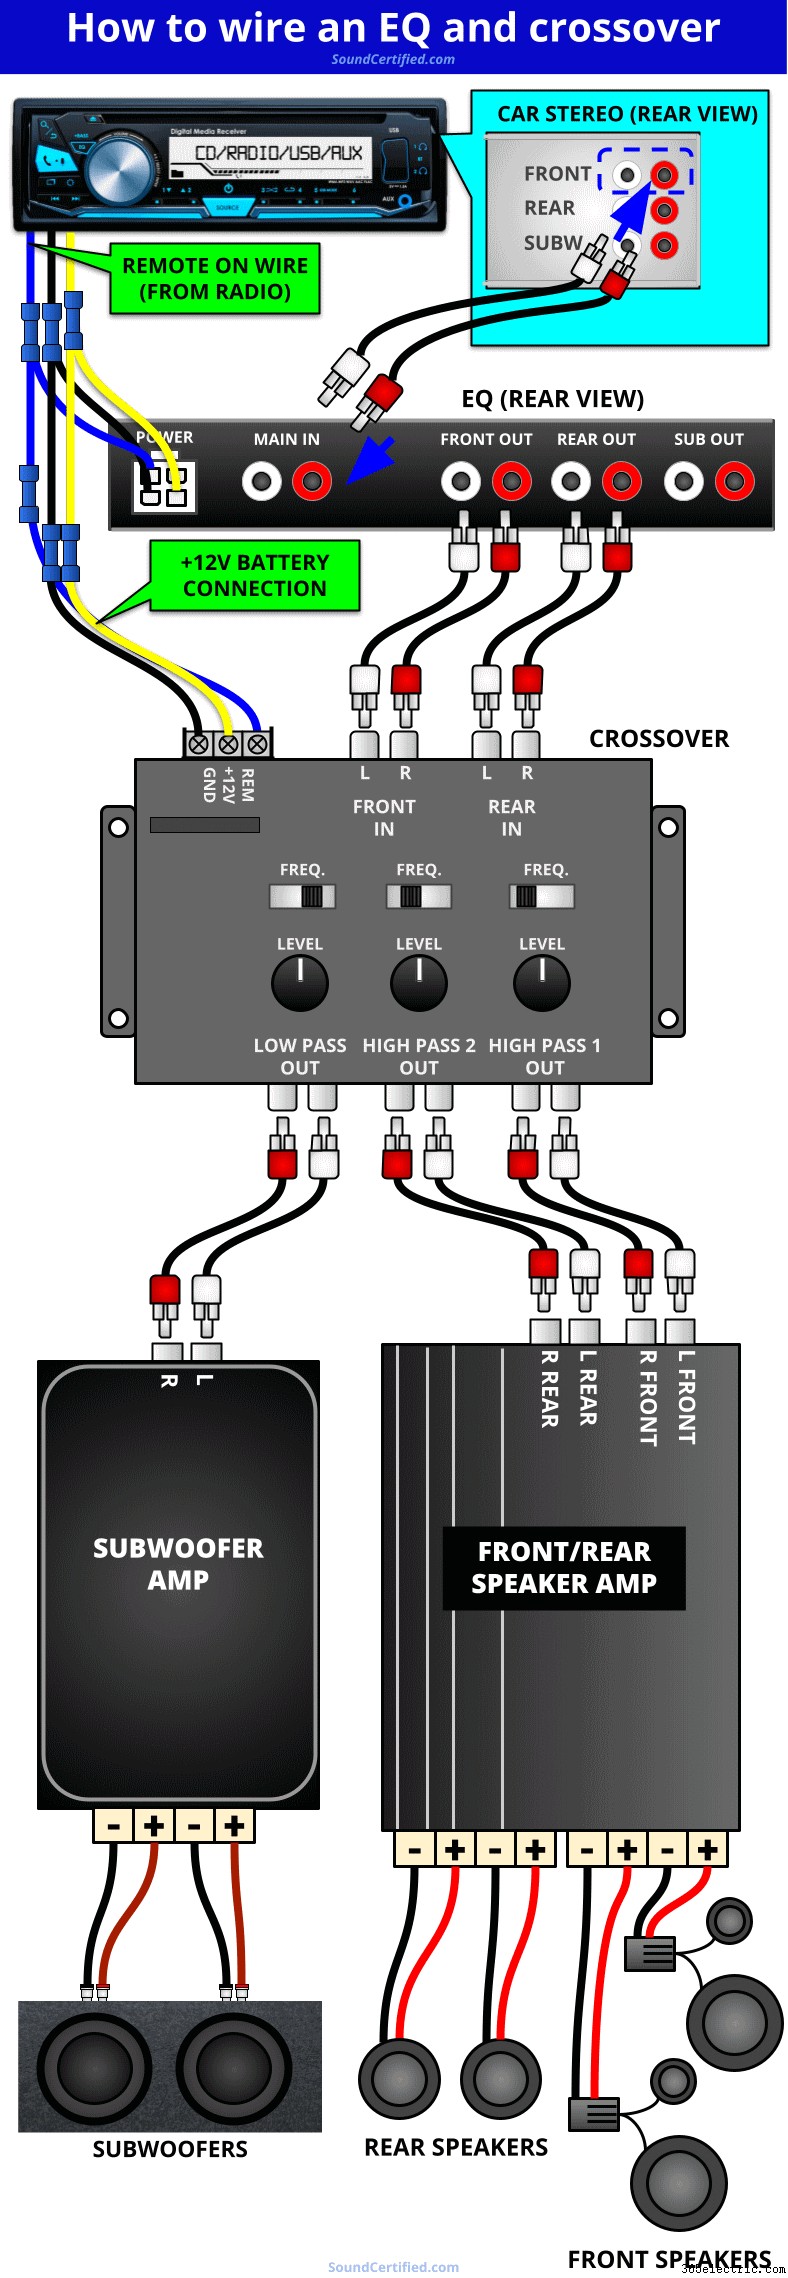
This diagram shows the basic connections for an equalizer and crossover. While the particular equalizer or crossover you have may be slightly different, most have very similar connections.
The diagram above is a guide for how to make the right connections for your equalizer and your crossover. You can expect some slight differences depending on the model you have and the system you’re wanting to install but most should be very similar.
How do you connect a crossover to an equalizer?
To connect a crossover to an equalizer you’ll want to use the front or main RCA outputs of the equalizer for the inputs to the front channels or main inputs on your crossover.
- Full range input(s): the crossover’s main signal input from your car stereo or in this case the equalizer. The equalizer will send a full-range signal which you can then divide as needed for your system using the provided outputs. Some crossovers only have a single pair of inputs while others have front, rear, and sometimes even subwoofer inputs. These additional inputs are usually optional.
- High-pass outputs: these are the high pass (bass blocked) audio outputs for your main amplifier channels such as front or rear speakers. Using the selectable crossover frequency you can block bass and instead send it to subwoofers for better sound &power handling.
- Low-pass outputs: these are for sending only bass to your amplifier used for midbass speakers or subwoofers. Low pass outputs on a crossover usually have a selectable crossover frequency similar to the high-pass outputs, but usually limited to 250Hz or below.
Connecting power to a crossover
Crossovers normally have wiring similar to an equalizer:a ground wire (negative), +12V battery wire, and a remote-on wire. If it’s convenient you can connect the crossover and equalizer wiring to the connections at the radio:
- +12V battery connection:connect to the radio’s memory wire or another power source that has +12V all the time (does not change with the ignition switch).
- Ground wire:connect to the vehicle’s chassis via bare metal or the same ground wire as the car stereo.
- Remote wire connection:connect to the car stereo’s remote wire or alternatively a +12V accessory wire that turns on &off with the ignition.
Can I use a separate crossover and my amp’s crossover?
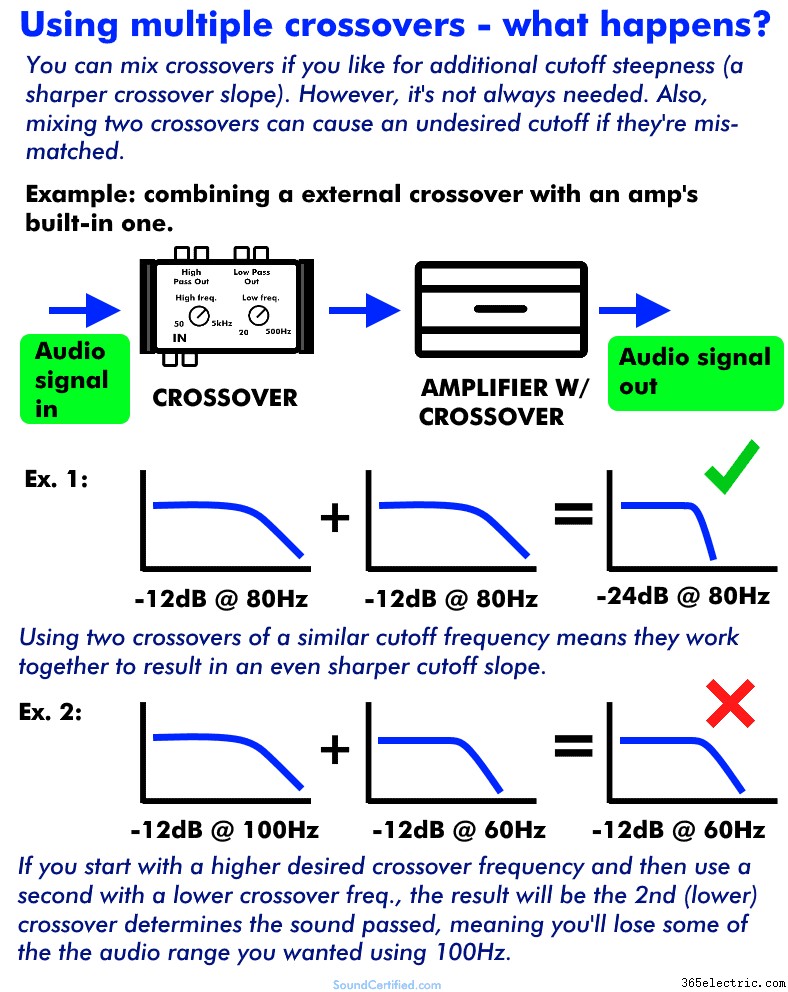
Yes, in many cases you can use an external crossover and the one built into your amplifier or head unit. However, it’s generally not needed in most cases.
These days it’s pretty standard to find -12dB per octave crossovers (also called “2nd order”) in electronic crossovers and amplifiers too. That’s normally a pretty good cutoff steepness for all sorts of speakers including main speakers, tweeters, and subwoofers.
However, if you need an even steeper crossover frequency (say -18dB or -24dB per octave) you can use more than one. There are some things you’ll need to know first:
- You can combine the crossovers for similar cutoff frequencies. The steepness will combine, meaning you’ll get even better filtering of unwanted sound frequencies.
- Mismatched crossovers can mean you’ll have undesirable sound. For example, let’s say you’ve set your crossover to 70Hz and you’re also using an amp’s crossover set at about 50Hz. The end result is the lower cutoff frequency from the amp would block portions of sound you wanted.
When in doubt, always use a 2nd crossover that’s of the same or higher cutoff frequency and you should be ok. As some of today’s car stereos include high or low-pass crossovers, those can be used as well (or instead of the ones built into your amp). They’re also more convenient to change too since they’re right there in the dash.
What are good crossover frequencies for car audio?
Car speakers are somewhat different from home audio in that they often suffer from terrible enclosures which aggravates the problems they have when producing certain sounds. I’ve put together some crossover frequencies below as general guidelines that work well in most cases. You may need to tweak them a bit for your particular system.
For example, small speakers with no real enclosure may have horribly “thin” sound – in that case, you may need to raise the high-pass filter (HPF) frequency even higher to minimize sound problems. Use these as a starting point, see what you get, and go from there.
As a side note, be aware that a crossover can’t compensate for a subwoofer that’s poorly matched to a speaker box. It’s very important for good bass sound to have subwoofers in an enclosure of the right size and type.
Car audio speaker & crossover frequency table
| Speaker/System Type | Crossover Freq. &Type | Notes |
|---|---|---|
| Subwoofers | 70-80 Hz (low pass) | Good low-pass frequency range for subwoofer bass &blocking midrange sounds. Best for pure, clear bass sound that "hits." |
| Car main (full range) speakers | 56-60Hz (high pass) | Blocks low-end bass that causes distortion or speakers to "bottom out." Great compromise between full-range sound and midrange bass capability. |
| Tweeters or 2-way speakers | 3-3.5KHz (high pass, or high/low-pass) | Most 2-way or 1-way (tweeter) crossovers use a frequency near this as most tweeters can't handle sounds below this range. Same for woofers above this range. |
| Midrange/woofer | 1K-3.5KHz (low pass) | Woofers and many midrange speakers do not perform well above this general range. They're poor for treble and a tweeter should be added. |
| 3-way system | 500Hz &3.5KHz (Woofer/tweeter crossover points) | Similar to 2-way systems the upper freq. would be the same. Midrange drivers in a 3-way system often do not perform well below 500Hz or 250Hz in many cases. |
What are some good EQ settings for the best sound?
The simple truth is that there’s not a true “best” equalizer or audio system setting. It depends on your goals, but ultimately, the best settings are those that let you tailor the sound in a way that pleases your ears the most.
Regardless, I do have some general equalizer guidelines that can help you. I’ll make sure to cover those in a separate section below after explaining why an equalizer (EQ) is so helpful and the problems with speaker sound.
To keep things organized I’ll break this down into two approaches:
<オール>1. Setting your EQ by ear
Here I’ll share with you some basic steps and EQ settings when doing it by ear. In the section after this, I’ll go into the best way to do so:by tuning your system using the right tools.
Note that tuning audio for car systems by ear is more for correcting the most obvious problems you can hear easily. To really know what’s going on with your system, you’ll need the right tools and approach I’ll share in the sound system car tuning guide below.Getting started
My advice is to do the following before adjusting an EQ:
- Disable any special audio modes like bass boost or “music enhancement.” Turn the bass boost, if present, to “flat” or off.
- Set the equalizer band adjustments all to flat. That is, to 0dB level, in the middle of the equalizer display (or to 0dB if it uses a number style control).
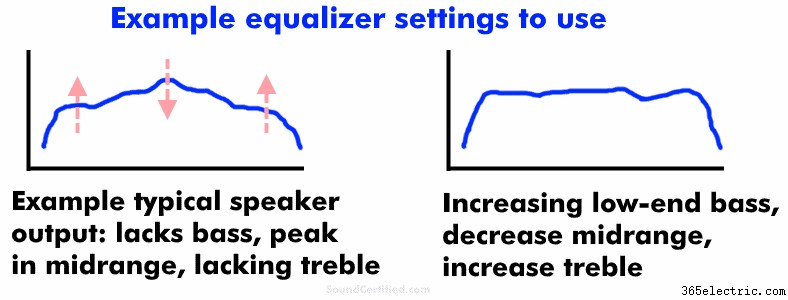
For many speaker systems (for example factory speakers with a factory-installed head unit), typically the sound is lacking in 2 or more areas:
- Not enough bass
- Too much midrange
- Not enough treble (high frequency sounds like cymbals and string instruments)
- Music has poor detail and doesn’t sound like the recording should
I recommend doing the following, being sure to use small adjustments with the equalizer and make changes slowly while listening carefully.
<オール>Visualizing adjusting an EQ for the most basic ranges of sound
The idea is to know how the music should sound with everything set up properly and judge your EQ settings by ear using test music.
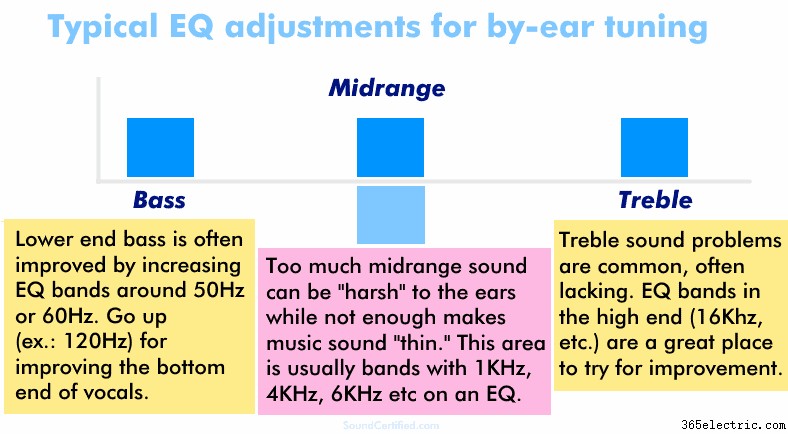
Our ears are most sensitive in the midrange span of sounds so that’s often one of the biggest problem areas of speakers that need attention. Tweeters very often need some increase at the high end, too. It’s a huge problem with factory-installed tweeters that have a poor response (sound output) at the highest end of the sound range.
2. Using a real-time analyzer (RTA) to tune your EQ
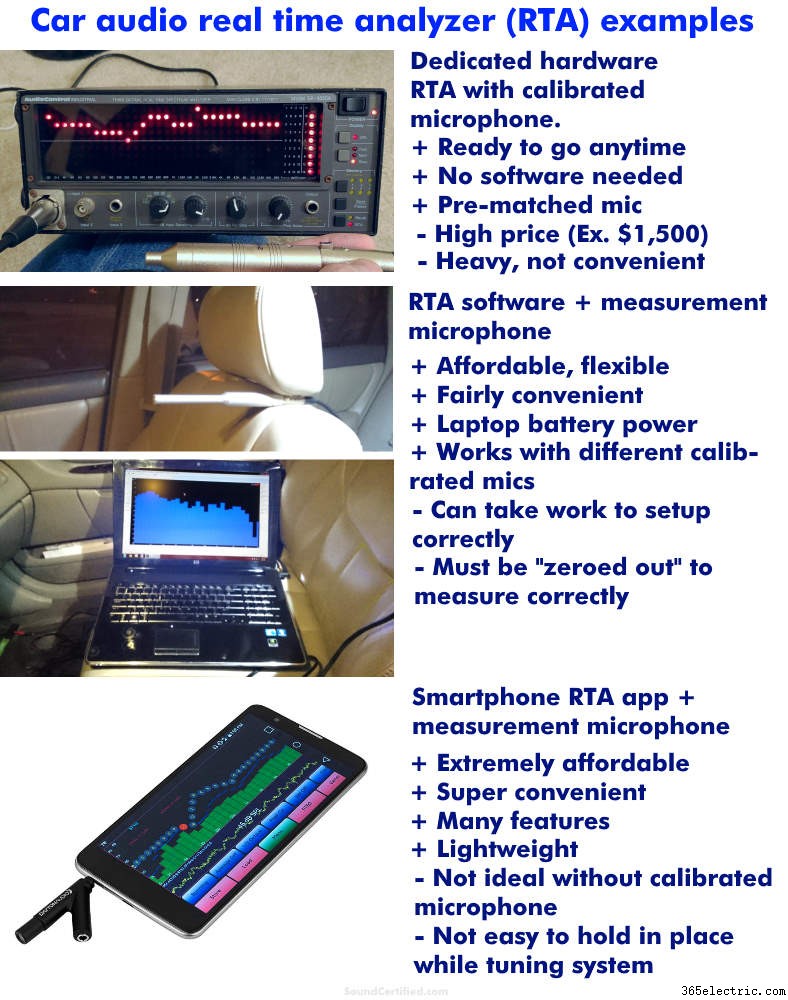
Some examples of your options for measuring and tuning your car audio speaker system. Of the 3, using a laptop and RTA software or smartphone app are the best values for the dollar. Today’s smartphone apps like AudioTool offer many of the same features as much more expensive options.
The best way to tune your system (find the optimal equalizer settings) is to use a measurement tool and find the areas that needed adjusting. To do so, you’ll need a real-time analyzer (RTA) and microphone. There’s simply NO WAY to get the best sound using only some music and adjusting it by ear.
This used to be way too expensive in the past. However, these days you can find get good results using your laptop and RTA software (such as TrueRTA, for example) or use an inexpensive RTA app with your Apple or Android smartphone.
For the sake of keeping things simple, I’ll cover using a smartphone and an RTA app. I recommend AudioTool for Android as it’s very good and while it’s not free, it’s cheap! ($7.99 at this time). Using an app isn’t as accurate as a more expensive setup but it’s enough in most cases to get the job done pretty well.
Using an RTA app and microphone for tuning sound
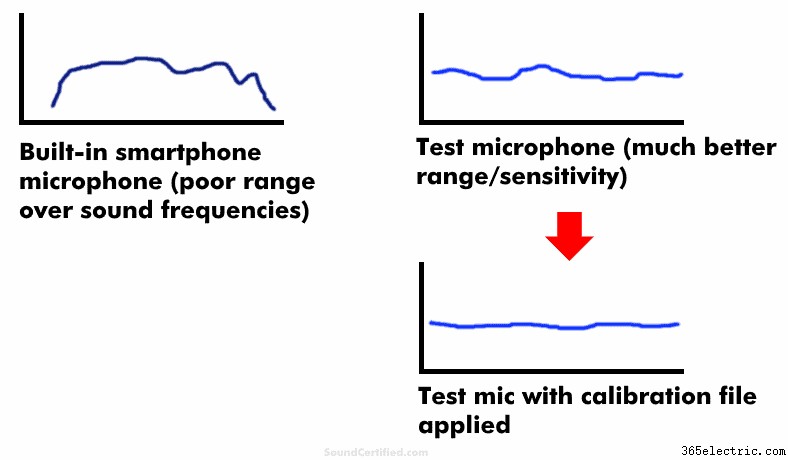
I don’t recommend using a smartphone’s built-in mic for tuning your equalizer settings. Built-in mics have poor frequency measurement performance compared to a real test microphone. Calibrated microphones also include a file to allow them to give a near-perfect measurement if your RTA supports it.
While you can use your smartphone’s built-in microphone to tune your system and set your EQ, I don’t recommend it. Built-in mics have poor performance for measuring sound and your readings won’t be very good. This means you’ll never be able to get the sound quite right sadly.
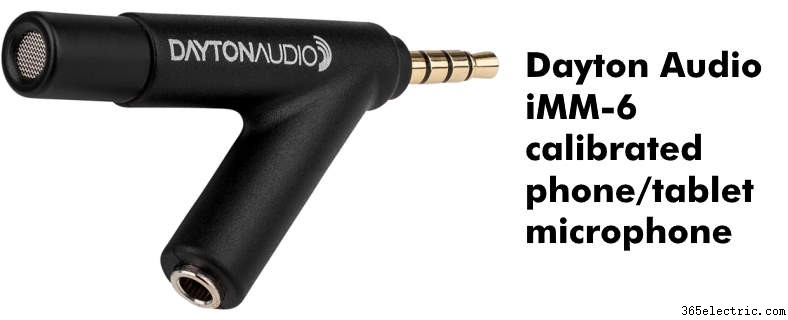
One option is to pick up an affordable calibrated microphone like the Dayton Audio iMM-6 at around $17. As an added bonus, each one includes a unique calibration file to help you get more accurate readings. To use that you’ll need an audio app that supports importing a calibration text file. (Not critical by any means but nice if you can)
More great audio articles to help
Would you love to learn more? Check out some of my other great articles!
- Find out how crossovers work and the science behind them.
- Wrong speaker Ohms rating? Here’s what happens if you use the wrong speaker impedance with a crossover.
- Find out what happens to dB volume &power when you increase speaker impedance.
- Set up your system the right way! Here’s how to set crossover frequencies for car audio.
- Check out my detailed guide to crossovers, slopes, and good crossover frequencies for car or home audio.